Love this? Save it for later!
Share the inspiration with your friends
Introduction
I thought rolling up a sandwich would be a no-brainer. Just slap some stuff on bread, roll it tight, slice it, and voilà—lunchbox magic. It took about three tries and a minor flour explosion in my kitchen before I figured out how to make these Easy Flavor-Packed Lunchbox Pinwheel Sandwiches actually taste like something worth biting into. Honestly, the first batch looked like sad little spirals, and the flavors just didn’t sing. But there’s something about the way these sandwiches come together—layering creamy spreads, fresh crunchy veggies, and a punch of seasoning all wrapped in soft tortillas—that makes you want to pack them for every meal.
What surprised me most was how these pinwheels hold their own, even after sitting in a lunchbox for hours. The ingredients don’t get soggy or limp; the flavors actually meld and deepen. I still remember the quiet moment when my kid took that first bite at school and gave me a thumbs-up with a grin that said, “Yep, you nailed it.” It stuck with me because it’s not just another sandwich thrown together. These pinwheels are simple, practical, and—dare I say—kind of fun to make. If you want a lunch that feels fresh, tastes exciting, and doesn’t need a microwave rescue, this is it.
Why You’ll Love This Recipe
After testing this recipe multiple times (and yes, eating way more than I probably should have), here’s why these Easy Flavor-Packed Lunchbox Pinwheel Sandwiches have earned a permanent spot in my meal prep rotation:
- Quick & Easy: Ready in under 20 minutes, perfect when you’re juggling a million things and need lunch on the fly.
- Simple Ingredients: No obscure stuff here—just pantry staples and fresh produce you probably already have around.
- Perfect for Lunchboxes & Picnics: These pinwheels travel well and make lunchtime feel like a treat, whether at school, work, or a backyard get-together.
- Crowd-Pleaser: They get rave reviews from picky eaters and grown-ups alike. The bite-sized slices are just the right portion.
- Unbelievably Delicious: The combo of creamy, crunchy, and savory flavors sets it apart from your average sandwich—trust me, this isn’t your basic PB&J.
What makes this recipe stand out is the layering technique and the choice of spreads. For example, blending cream cheese with a touch of fresh herbs creates a luscious base that keeps everything moist without sogginess. Plus, swapping traditional sandwich bread for soft tortillas means you get that perfect roll and slice action. It’s oddly satisfying to slice through those pinwheels and see the colorful layers spiral around.
Honestly, making these sandwiches feels like a little lunchtime win—a small joy in the everyday hustle. And if you’re looking to impress a crowd without stress, this recipe has your back.
What Ingredients You Will Need
This recipe uses simple, wholesome ingredients to deliver bold flavor and satisfying texture without the fuss. Most of these items are pantry staples or easy to find fresh. Feel free to swap ingredients depending on your preferences or what’s on hand.
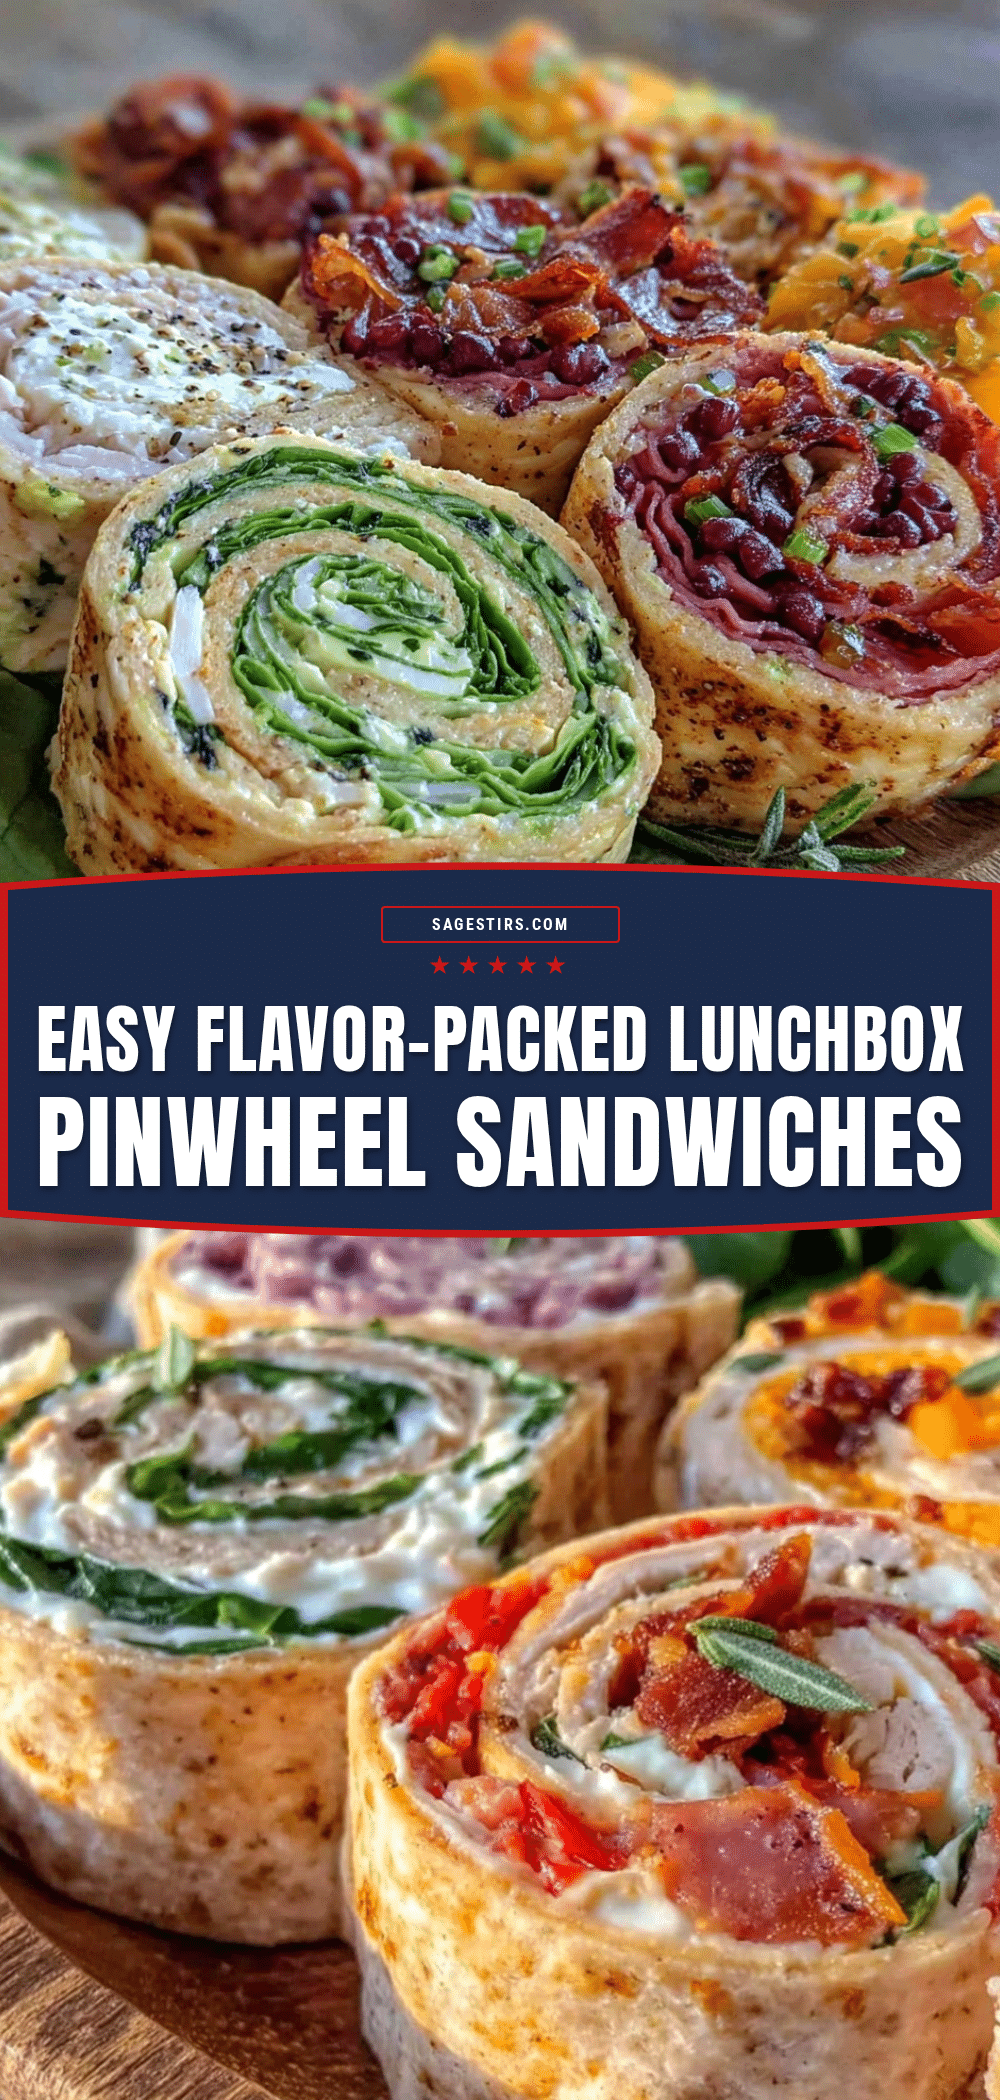
- Large flour tortillas – soft and pliable, about 8-inch diameter (look for burrito-style tortillas for best rolling)
- Cream cheese, softened – the creamy base that holds everything together (I like Philadelphia for smooth texture)
- Mayonnaise – adds a subtle tang and extra creaminess (use light mayo if preferred)
- Dijon mustard – just a teaspoon for a mild kick
- Cooked deli turkey or chicken slices – about 8 ounces, thinly sliced (you can swap for ham or roast beef)
- Sharp cheddar cheese, shredded – 1 cup for melty, savory goodness
- Fresh spinach leaves – a handful for crunch and color
- Red bell pepper, thinly sliced – adds sweetness and crunch
- Green onions, finely chopped – about 2, for a mild oniony pop
- Fresh dill or parsley, chopped – optional but highly recommended for brightness
- Salt and freshly ground black pepper – to taste
Substitution tips: For dairy-free, swap cream cheese and mayo for vegan spreads. Use gluten-free tortillas to keep this recipe gluten-free. In summer, try swapping spinach for fresh basil or adding sliced cucumbers for extra crunch. If you want a vegetarian version, replace the turkey with roasted red pepper strips or avocado slices.
Equipment Needed

- Sharp chef’s knife – essential for clean, uniform pinwheel slices
- Cutting board – choose a sturdy one for ease and safety
- Mixing bowl – to blend cream cheese, mayo, and mustard
- Rubber spatula or butter knife – for spreading the cream cheese mixture evenly
- Measuring cups and spoons – to keep ingredient portions consistent
- Plastic wrap or parchment paper – to wrap the rolled tortillas tightly before slicing
If you don’t have a chef’s knife, a serrated knife can work but may tear the tortillas. I recommend sharpening your knives regularly; it makes slicing smoother and safer. For budget-friendly kitchen gear, you can grab decent knives and cutting boards at most grocery stores or online without breaking the bank.
Preparation Method
- Prep your ingredients: Soften the cream cheese by letting it sit at room temperature for 15 minutes. Thinly slice the red bell pepper and green onions. Shred the cheddar cheese and wash the spinach leaves thoroughly.
- Make the spread: In a medium bowl, combine 8 ounces (about 227 grams) of softened cream cheese with 2 tablespoons (~30 ml) mayonnaise and 1 teaspoon (~5 ml) Dijon mustard. Stir until smooth and creamy. Add a pinch of salt, freshly ground black pepper, and chopped dill or parsley if using. This spread should be thick but spreadable.
- Lay out the tortillas: Place one flour tortilla on a clean surface. Using a spatula or butter knife, spread about 2-3 tablespoons (~30-45 grams) of the cream cheese mixture evenly over the entire surface, leaving about half an inch around the edges bare. This helps with rolling.
- Add the fillings: Layer about 2 ounces (~60 grams) of deli turkey slices evenly over the spread. Sprinkle a quarter cup (about 28 grams) of shredded cheddar cheese on top. Add a small handful of spinach leaves and evenly distribute a few slices of red bell pepper and some chopped green onions.
- Roll it up: Starting from one edge, roll the tortilla tightly but gently to avoid tearing. The cream cheese spread acts like glue, so it should hold the roll together nicely.
- Wrap and chill: Wrap the rolled tortilla tightly in plastic wrap or parchment paper. Place in the fridge for at least 30 minutes to firm up. This step is key because it makes slicing easier and helps the pinwheels hold their shape.
- Slice into pinwheels: Remove the wrap and use a sharp knife to cut the roll into 1-inch (~2.5 cm) thick slices. Arrange on a plate and serve immediately, or pack them in a lunchbox.
Pro tip: If your knife drags or squishes the roll, wipe it clean between cuts and use a gentle sawing motion. Also, chilling the rolls is non-negotiable if you want neat slices that don’t fall apart.
Cooking Tips & Techniques
Making these pinwheel sandwiches look good and taste great isn’t rocket science, but a few tricks make all the difference:
- Softening your cream cheese is crucial. Cold cream cheese is stubborn and tears tortillas when spreading. Let it sit out or microwave briefly (5-7 seconds) to get it spreadable.
- Don’t overstuff. Too many fillings make rolling a nightmare and cause the pinwheels to fall apart. Less is more.
- Roll firmly but gently. You want a tight spiral without squeezing out the fillings or ripping the tortilla.
- Chill before slicing. This is my biggest lesson learned the hard way. It helps everything settle and cuts cleaner.
- Use a sharp knife. Dull knives will drag and squish the roll, ruining the neat slices.
- Prep ahead. You can make these a day in advance; flavors develop nicely but keep them chilled until serving.
I once tried skipping the chilling step in a rush, and the pinwheels unraveled on the plate—lesson learned! Also, if you want to jazz them up, sprinkle a bit of smoked paprika or chili flakes on the cream cheese spread for a smoky kick. Timing-wise, while these are quick to assemble, prepping veggies ahead saves time during weekday mornings.
Variations & Adaptations
These pinwheel sandwiches are like a blank canvas—easy to tweak for diet, season, or taste:
- Vegetarian: Replace deli meat with roasted red peppers, grilled zucchini, or sliced avocado. Add a layer of hummus for extra flavor.
- Gluten-free: Use gluten-free tortillas or large lettuce leaves for wraps (but note lettuce wraps are trickier to roll tightly).
- Spicy twist: Add sliced jalapeños to the filling or mix hot sauce into the cream cheese spread.
- Seasonal veggies: In summer, throw in thin cucumber slices or shredded carrots. In fall, roasted sweet potato cubes make a cozy addition.
- Different proteins: Swap turkey for leftover grilled chicken (try easy juicy chicken recipes), smoked salmon, or even bacon bits for extra indulgence.
I personally love the vegetarian version with hummus and fresh basil when the garden is bursting with herbs. It’s a fresh change from the usual and perfect alongside a crunchy salad or a cup of soup.
Serving & Storage Suggestions
These pinwheels are best served chilled or at room temperature. They make great finger foods for parties, lunches, or kid-friendly snacks.
- Serving: Arrange slices on a platter with a garnish of fresh herbs or a side of pickles and fresh fruit for a complete meal.
- Pairings: They go wonderfully with crisp salads like an easy pasta salad or a fresh Mediterranean mezze platter for variety and color.
- Storage: Store leftovers tightly wrapped in the refrigerator for up to 2 days. Pinwheels might soften over time but generally hold up well.
- Reheating: These aren’t really meant to be reheated. If you want them warm, unwrap and microwave quickly (15-20 seconds), but I recommend enjoying them cold or room temp for best texture.
- Flavor development: The flavors meld beautifully after sitting for a few hours, so prepping in the morning for afternoon lunch is a great strategy.
Nutritional Information & Benefits
Each pinwheel slice is a balanced mini-meal with protein, veggies, and carbs. While exact values depend on ingredient brands and portions, a typical serving (3-4 pinwheels) has approximately:
| Nutrient | Amount |
|---|---|
| Calories | 250-300 kcal |
| Protein | 12-15 grams |
| Carbohydrates | 20-25 grams |
| Fat | 12-15 grams |
| Fiber | 2-4 grams |
Key ingredients like spinach add vitamins A and C, while the lean turkey provides a good protein boost. Using whole wheat or gluten-free tortillas can tailor the recipe for specific dietary needs. This recipe contains dairy (cream cheese, cheddar) and gluten unless you swap the tortillas.
From a wellness perspective, these pinwheels fit well into a balanced diet, offering a satisfying meal that’s not heavy or greasy. They’re also easy to customize if you’re watching carbs or calories.
Conclusion
These Easy Flavor-Packed Lunchbox Pinwheel Sandwiches have become my go-to for fuss-free, tasty lunches that feel a bit special. They’re adaptable, straightforward, and actually fun to make (once you get the hang of rolling). I love how they bring a little surprise spiral of flavor to an otherwise ordinary day.
Feel free to tailor the fillings to your family’s tastes or what’s fresh and in season. Whether packed for school, work, or a casual get-together, these pinwheels bring good vibes and even better bites.
If you try them, I’d love to hear how you made them your own—drop a comment or share your favorite twist! Remember, lunch doesn’t have to be boring, and these pinwheels prove it.
FAQs About Lunchbox Pinwheel Sandwiches
Can I make these pinwheel sandwiches ahead of time?
Absolutely! Rolling and chilling them a few hours or even a day ahead works great. Just keep them wrapped tightly in the fridge to maintain freshness.
What if I don’t have cream cheese?
You can substitute with hummus or a thick yogurt-based spread, but cream cheese gives the best texture and flavor balance.
How do I keep the tortillas from tearing when rolling?
Use soft, pliable tortillas and spread the cream cheese evenly without going right to the edge. Rolling gently but firmly helps, plus chilling before slicing is key.
Can I freeze these pinwheels?
They don’t freeze well because the veggies release water when thawed, making the tortillas soggy. Better to enjoy fresh or refrigerated.
What’s a good vegetarian filling option?
Try roasted vegetables, avocado slices, hummus, or cheese with fresh herbs and crunchy greens for a satisfying meat-free version.
Pin This Recipe!
Easy Flavor-Packed Lunchbox Pinwheel Sandwiches

These pinwheel sandwiches are quick, easy, and perfect for lunchboxes or picnics. They combine creamy spreads, fresh veggies, and savory deli meat rolled in soft tortillas for a flavorful, mess-free meal.
- Prep Time: 15 minutes
- Cook Time: 0 minutes
- Total Time: 45 minutes
- Yield: 4 servings 1x
- Category: Lunch
- Cuisine: American
Ingredients
- Large flour tortillas – soft and pliable, about 8-inch diameter
- 8 ounces cream cheese, softened
- 2 tablespoons mayonnaise
- 1 teaspoon Dijon mustard
- 8 ounces cooked deli turkey or chicken slices, thinly sliced
- 1 cup sharp cheddar cheese, shredded
- Handful fresh spinach leaves
- Red bell pepper, thinly sliced
- 2 green onions, finely chopped
- Fresh dill or parsley, chopped (optional)
- Salt and freshly ground black pepper, to taste
Instructions
- Soften the cream cheese by letting it sit at room temperature for 15 minutes. Thinly slice the red bell pepper and green onions. Shred the cheddar cheese and wash the spinach leaves thoroughly.
- In a medium bowl, combine 8 ounces softened cream cheese with 2 tablespoons mayonnaise and 1 teaspoon Dijon mustard. Stir until smooth and creamy. Add a pinch of salt, freshly ground black pepper, and chopped dill or parsley if using.
- Place one flour tortilla on a clean surface. Spread about 2-3 tablespoons of the cream cheese mixture evenly over the entire surface, leaving about half an inch around the edges bare.
- Layer about 2 ounces of deli turkey slices evenly over the spread. Sprinkle a quarter cup of shredded cheddar cheese on top. Add a small handful of spinach leaves and evenly distribute a few slices of red bell pepper and some chopped green onions.
- Starting from one edge, roll the tortilla tightly but gently to avoid tearing.
- Wrap the rolled tortilla tightly in plastic wrap or parchment paper. Place in the fridge for at least 30 minutes to firm up.
- Remove the wrap and use a sharp knife to cut the roll into 1-inch thick slices. Arrange on a plate and serve immediately, or pack them in a lunchbox.
Notes
Softening the cream cheese is crucial for easy spreading. Chill the rolled tortillas before slicing to ensure neat pinwheels. Use a sharp knife and a gentle sawing motion to slice cleanly. Can be made dairy-free or gluten-free with substitutions. Avoid overstuffing to prevent tearing.
Nutrition
- Serving Size: 3-4 pinwheel slices
- Calories: 275
- Sugar: 3
- Sodium: 450
- Fat: 13.5
- Saturated Fat: 6
- Carbohydrates: 22.5
- Fiber: 3
- Protein: 13.5
Keywords: pinwheel sandwiches, lunchbox recipes, quick lunch, healthy sandwiches, turkey sandwiches, easy sandwiches, picnic food