Love this? Save it for later!
Share the inspiration with your friends
“I wasn’t expecting to find the perfect healthy snack recipe while waiting in line at the community garden’s summer fair,” I confessed to my friend, still amazed by the serendipity of that moment. The sun was warm, the scent of fresh herbs filled the air, and an elderly woman next to me was chatting about her favorite anti-inflammatory foods. She pulled out a small cup filled with vibrant layers of red, white, and blue berries atop a creamy pudding. “You have to try this,” she said, smiling as she handed me a spoon.
That simple moment sparked a culinary adventure that led to the creation of these Fresh Anti-Inflammatory Red White and Blue Berry Chia Pudding Cups. Honestly, it was a little messy at first—I forgot to soak the chia seeds overnight, and the kitchen looked like a berry battlefield. But by the time I tasted the smooth, subtly sweet pudding layered with the bright burst of berries, I knew this recipe was going to stick around.
Maybe you’ve been there too—the craving for something fresh and nourishing that doesn’t feel like a chore to make. This recipe blends wholesome ingredients that not only taste amazing but also pack a punch for your body’s wellness. I keep making these cups, especially on hectic mornings or lazy afternoons when a quick, healthy snack is exactly what I need. Let me tell you, it’s the kind of treat that makes you pause, savor, and feel good about what you’re eating.
Why You’ll Love This Recipe
This recipe has become a staple in my kitchen for plenty of reasons, and I bet you’ll find it just as delightful. After numerous trials and tweaks, it’s fully tested to balance flavor, texture, and health benefits.
- Quick & Easy: Ready in about 10 minutes, plus chilling time—ideal for busy mornings or on-the-go snacks.
- Simple Ingredients: Uses pantry-friendly staples like chia seeds and easily found fresh or frozen berries.
- Perfect for Any Occasion: Whether it’s a light dessert, a brunch addition, or a post-workout bite, these pudding cups fit right in.
- Crowd-Pleaser: Kids, adults, picky eaters—you name it, everyone enjoys the creamy texture paired with fresh berries.
- Unbelievably Delicious: The subtly nutty chia pudding combined with the tart and sweet berry layers creates a flavor harmony that’s just right.
What makes these chia pudding cups different? Well, blending white Greek yogurt (or a plant-based option) into the chia mixture gives it a creamier texture than most recipes. Plus, the red, white, and blue berry combo is not just festive—it’s loaded with antioxidants that help calm inflammation. I love how this recipe feels like a small celebration in a cup, but it’s super simple to throw together. Honestly, it’s comfort food with a refreshing twist that keeps me coming back for more.
What Ingredients You Will Need
This recipe uses simple, wholesome ingredients to deliver bold flavor and satisfying texture without the fuss. Most of these are pantry staples or easy to find fresh at your local market.
- For the Chia Pudding Base:
- 1/4 cup chia seeds (about 40g) – I prefer Viva Naturals for consistent quality
- 1 cup unsweetened almond milk (240ml) or any milk of choice (dairy or plant-based)
- 1/2 cup plain Greek yogurt, full-fat or low-fat (120g) – for creaminess; use coconut yogurt for dairy-free
- 1-2 tablespoons maple syrup or honey, adjust to taste (adds gentle sweetness)
- 1 teaspoon pure vanilla extract (for aroma and depth)
- Pinch of sea salt (balances flavors)
- For the Berry Layers:
- 1/2 cup fresh strawberries, sliced (75g) – in summer, swap with fresh raspberries
- 1/2 cup fresh blueberries (75g) – frozen works fine too, just thaw before layering
- 1/2 cup fresh raspberries (75g)
- Optional: a few fresh mint leaves, chopped, for garnish and a fresh hint
- Extras (optional):
- 1 tablespoon chia seeds for sprinkling on top (adds crunch)
- 1 tablespoon toasted coconut flakes (adds texture and tropical flavor)
Feel free to swap maple syrup with agave nectar if you prefer a milder sweetness. If you’re avoiding nuts, oat or rice milk works beautifully here. The key is to use fresh, ripe berries for that perfect balance of tart and sweet. I once tried frozen berries straight from the freezer—definitely a no-go unless thawed, or you’ll end up with icy pudding layers!
Equipment Needed
- Mixing bowl – I find a medium glass bowl works best for mixing and soaking chia seeds.
- Whisk or fork – to combine ingredients thoroughly; a small hand whisk makes light work.
- Measuring cups and spoons – for accuracy, especially measuring chia seeds and liquids.
- Small glass jars or clear plastic cups – perfect for layering and serving these pudding cups. Mason jars are ideal and reusable.
- Refrigerator – chilling is essential to get the pudding to the right consistency.
If you don’t have glass jars, small bowls or even silicone muffin cups work in a pinch. I’ve also used a blender to mix the pudding base quickly, which is handy if you want an ultra-smooth texture. Just remember to clean your whisk or blender promptly; chia seeds can clump and get sticky if left too long. Budget-wise, you don’t need anything fancy here—just basic kitchen staples, and you’re good to go.
Preparation Method

- Mix the Chia Pudding Base (5 minutes): In your mixing bowl, combine 1/4 cup chia seeds, 1 cup almond milk, 1/2 cup Greek yogurt, 1-2 tablespoons maple syrup, 1 teaspoon vanilla extract, and a pinch of sea salt. Whisk vigorously to break up any clumps. The mixture should look slightly runny but well blended.
- Let it Soak (at least 4 hours or overnight): Cover the bowl and refrigerate. The chia seeds will absorb the liquid and swell, creating a thick, creamy pudding. If you’re pressed for time, 4 hours works, but overnight is best for that perfect texture.
- Prepare the Berries (5 minutes): Wash and slice strawberries, rinse blueberries and raspberries gently. Pat dry with paper towels to avoid extra moisture diluting your pudding layers.
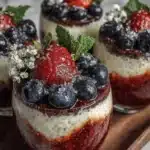
- Layer the Pudding Cups (10 minutes): Start with a spoonful of chia pudding at the bottom of your jar or cup. Add a layer of sliced strawberries (red), then another layer of pudding (white), followed by a layer of blueberries (blue). Repeat if your jars are tall. Finish with raspberries on top or mix them with blueberries for a richer blue layer.
- Chill Before Serving (optional but recommended): Let the layered cups chill for 30 minutes before serving to meld flavors and firm up slightly.
- Garnish and Serve: Sprinkle with extra chia seeds or toasted coconut flakes, and a few mint leaves for freshness.
Note: If the pudding is too thick after soaking, stir in a splash of almond milk to loosen it gently. If too thin, add a teaspoon more chia seeds and let it rest for another 30 minutes.
When making these, I usually prepare the pudding base the night before, then assemble the cups fresh in the morning. It saves time and keeps the berries bright and fresh. Also, layering is where you can get creative—sometimes I add a spoonful of homemade berry jam between layers for an extra punch of flavor.
Cooking Tips & Techniques
Chia pudding might seem straightforward, but a few tricks make all the difference between a lumpy mess and a silky treat. From personal experience, here’s what I’ve learned:
- Whisk early and often: Right after mixing chia seeds with liquids, whisk for at least a minute to avoid clumps.
- Use the right liquid ratio: Too much liquid makes pudding runny; too little, and it’s like jelly. The 1:4 chia-to-liquid ratio works well for this recipe.
- Pat your berries dry: Excess moisture can water down your pudding layers, so gently drying them helps maintain texture and vibrant colors.
- Layering matters: To keep those pretty red, white, and blue layers distinct, let each layer settle briefly before adding the next.
- Don’t skip the chilling: The pudding thickens and flavors deepen in the fridge. Patience here really pays off.
- Experiment with sweeteners: Maple syrup brings a warm note, but honey or agave nectar can fit your taste or dietary needs.
Once, I tried rushing the soaking step and ended up with crunchy, under-hydrated chia seeds—not fun. Now, I think of the soaking time as a mini meditation, knowing the pudding will come out just right. Also, multitasking works great here: prep the pudding base, then tidy the kitchen or prep other meals while it chills.
Variations & Adaptations
Want to switch things up? These pudding cups are super flexible:
- Dairy-Free Version: Swap Greek yogurt with coconut or almond yogurt for a creamy, plant-based pudding.
- Seasonal Berry Swap: In fall or winter, use pomegranate seeds, frozen cherries, or blackberries to keep it colorful and fresh.
- Spiced Twist: Add a pinch of cinnamon or cardamom to the pudding base for a warm, cozy flavor.
- Low-Sugar Option: Skip the maple syrup and use mashed ripe banana or a splash of vanilla for sweetness.
- Boost Protein: Stir in a scoop of vanilla protein powder into the pudding base for an energizing snack.
I once made a batch with mango and kiwi instead of berries—bright and tropical but lost the red-white-blue look! Still delicious, though. If you want to try a completely different texture, blend the soaked chia pudding before layering for an ultra-smooth mousse-like consistency.
Serving & Storage Suggestions
These chia pudding cups are best served chilled, straight from the fridge. I like to bring them out as a light dessert or a refreshing afternoon snack. They look fantastic on a brunch table, especially when garnished with fresh mint or a sprinkle of toasted coconut.
Pair these cups with a cup of green tea or a fresh-pressed juice for a wholesome treat. They also complement dishes like crispy garlic chicken nicely if you’re putting together a varied menu.
Store leftovers covered in the refrigerator for up to 3 days. The pudding may thicken over time, so stir gently before eating. You can freeze individual cups for up to a month, but thaw in the fridge overnight and stir well to restore texture.
Flavors tend to meld and brighten after resting, making the pudding even tastier the next day. Just try not to leave it too long, or the berries might start to break down.
Nutritional Information & Benefits
Each serving of these pudding cups offers roughly:
| Nutrient | Amount (per serving) |
|---|---|
| Calories | 210-250 kcal |
| Protein | 8-10 g |
| Fiber | 10 g |
| Fat | 8-10 g (mostly healthy fats) |
| Carbohydrates | 25-30 g (natural sugars from fruit and sweeteners) |
The chia seeds provide omega-3 fatty acids, fiber, and antioxidants that help reduce inflammation. Blueberries and strawberries are rich in vitamin C and flavonoids, which support immune health. The Greek yogurt adds protein and probiotics, great for digestion. This recipe is naturally gluten-free and can be made vegan by choosing plant-based yogurt and milk.
From a wellness perspective, I find these pudding cups a satisfying way to nourish my body without feeling heavy, especially when I need a mindful snack that supports my active lifestyle.
Conclusion
In a world full of complicated recipes and long ingredient lists, these Fresh Anti-Inflammatory Red White and Blue Berry Chia Pudding Cups are a breath of fresh air. They’re easy to make, packed with nutrients, and just plain tasty. Whether you’re after a healthy snack or a pretty dessert, this recipe fits the bill.
Feel free to customize it as you like—swap berries, adjust sweetness, or add your favorite toppings. I love that it’s so flexible yet always delivers that creamy, fresh burst of flavor. Honestly, this recipe has become a little ritual for me, a way to pause and enjoy something simple but special.
If you give it a try, I’d love to hear how you make it your own. Leave a comment below or share your favorite berry combos. Here’s to healthy snacking that’s as fun to make as it is to eat!
FAQs
Can I use frozen berries instead of fresh?
Yes, frozen berries work well but should be thawed and drained to avoid extra moisture that can thin the pudding layers.
How long does the chia pudding keep in the fridge?
Stored in an airtight container, chia pudding stays fresh for up to 3 days. Stir before serving if it thickens too much.
Is this recipe suitable for a vegan diet?
Absolutely! Just replace Greek yogurt with coconut or almond-based yogurt and use plant-based milk.
Can I prepare these pudding cups ahead of time for a party?
Yes, prepare the pudding base and soak chia seeds overnight, then assemble and chill cups a few hours before serving for best freshness.
What if I don’t have vanilla extract?
You can omit it or substitute with a small pinch of cinnamon or almond extract to add a different flavor note.
Pin This Recipe!

Fresh Anti-Inflammatory Red White and Blue Berry Chia Pudding Cups
A quick and easy healthy snack featuring creamy chia pudding layered with fresh red, white, and blue berries, perfect for nourishing and anti-inflammatory benefits.
- Prep Time: 10 minutes
- Cook Time: 0 minutes
- Total Time: 4 hours 10 minutes
- Yield: 4 servings 1x
- Category: Snack
- Cuisine: American
Ingredients
- 1/4 cup chia seeds (about 40g)
- 1 cup unsweetened almond milk (240ml) or any milk of choice (dairy or plant-based)
- 1/2 cup plain Greek yogurt, full-fat or low-fat (120g) or coconut yogurt for dairy-free
- 1–2 tablespoons maple syrup or honey, adjust to taste
- 1 teaspoon pure vanilla extract
- Pinch of sea salt
- 1/2 cup fresh strawberries, sliced (75g)
- 1/2 cup fresh blueberries (75g)
- 1/2 cup fresh raspberries (75g)
- Optional: a few fresh mint leaves, chopped, for garnish
- Optional extras: 1 tablespoon chia seeds for sprinkling on top
- Optional extras: 1 tablespoon toasted coconut flakes
Instructions
- Mix the chia pudding base: In a mixing bowl, combine 1/4 cup chia seeds, 1 cup almond milk, 1/2 cup Greek yogurt, 1-2 tablespoons maple syrup, 1 teaspoon vanilla extract, and a pinch of sea salt. Whisk vigorously to break up any clumps until slightly runny but well blended.
- Let it soak: Cover the bowl and refrigerate for at least 4 hours or overnight to allow chia seeds to swell and create a thick, creamy pudding.
- Prepare the berries: Wash and slice strawberries, rinse blueberries and raspberries gently, and pat dry with paper towels.
- Layer the pudding cups: Spoon chia pudding into the bottom of jars or cups, add a layer of sliced strawberries (red), then another layer of pudding (white), followed by a layer of blueberries (blue). Repeat if jars are tall. Finish with raspberries on top or mixed with blueberries.
- Chill before serving: Let the layered cups chill for 30 minutes to meld flavors and firm up slightly (optional but recommended).
- Garnish and serve: Sprinkle with extra chia seeds or toasted coconut flakes and a few mint leaves for freshness.
Notes
Whisk the chia seeds and liquids well to avoid clumps. Use fresh ripe berries and pat dry to prevent watery pudding layers. Soak chia seeds overnight for best texture. Adjust sweetness with maple syrup, honey, or agave nectar. For dairy-free, use plant-based yogurt and milk. If pudding is too thick after soaking, stir in a splash of almond milk; if too thin, add more chia seeds and rest. Can freeze individual cups for up to a month; thaw overnight in fridge.
Nutrition
- Serving Size: 1 pudding cup (appro
- Calories: 210250
- Sugar: 1015
- Sodium: 50100
- Fat: 810
- Saturated Fat: 12
- Carbohydrates: 2530
- Fiber: 10
- Protein: 810
Keywords: chia pudding, healthy snack, anti-inflammatory, berry pudding, red white and blue berries, vegan, gluten-free, easy snack