Love this? Save it for later!
Share the inspiration with your friends
Mixing red food coloring into batter while the kids are arguing over which superhero gets the last cookie, and half the kitchen timer’s been blinking its way to zero—that’s when the idea hit me. We needed a festive dessert for the Fourth of July cookout, but honestly, who’s got the time to fuss with complicated decorations? The usual boxed cakes just felt flat, and the grocery store options were, well, uninspiring at best. So, I grabbed my trusty red velvet cake recipe and thought, why not make it look like a flag? Adding cream cheese stars on top was a happy accident born out of “I hope this works” desperation, and it stuck. It’s colorful, fun, and somehow feels both celebratory and homey at once.
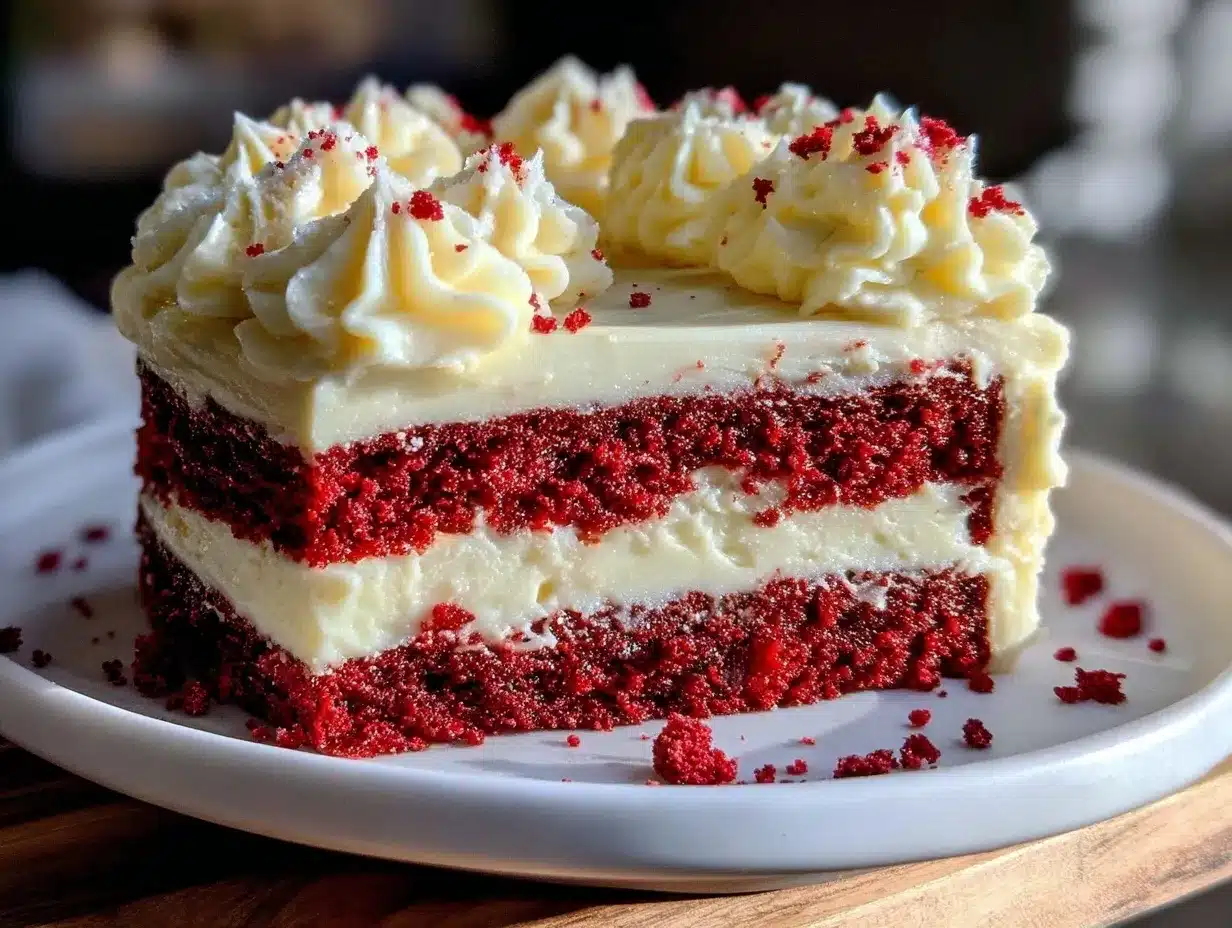
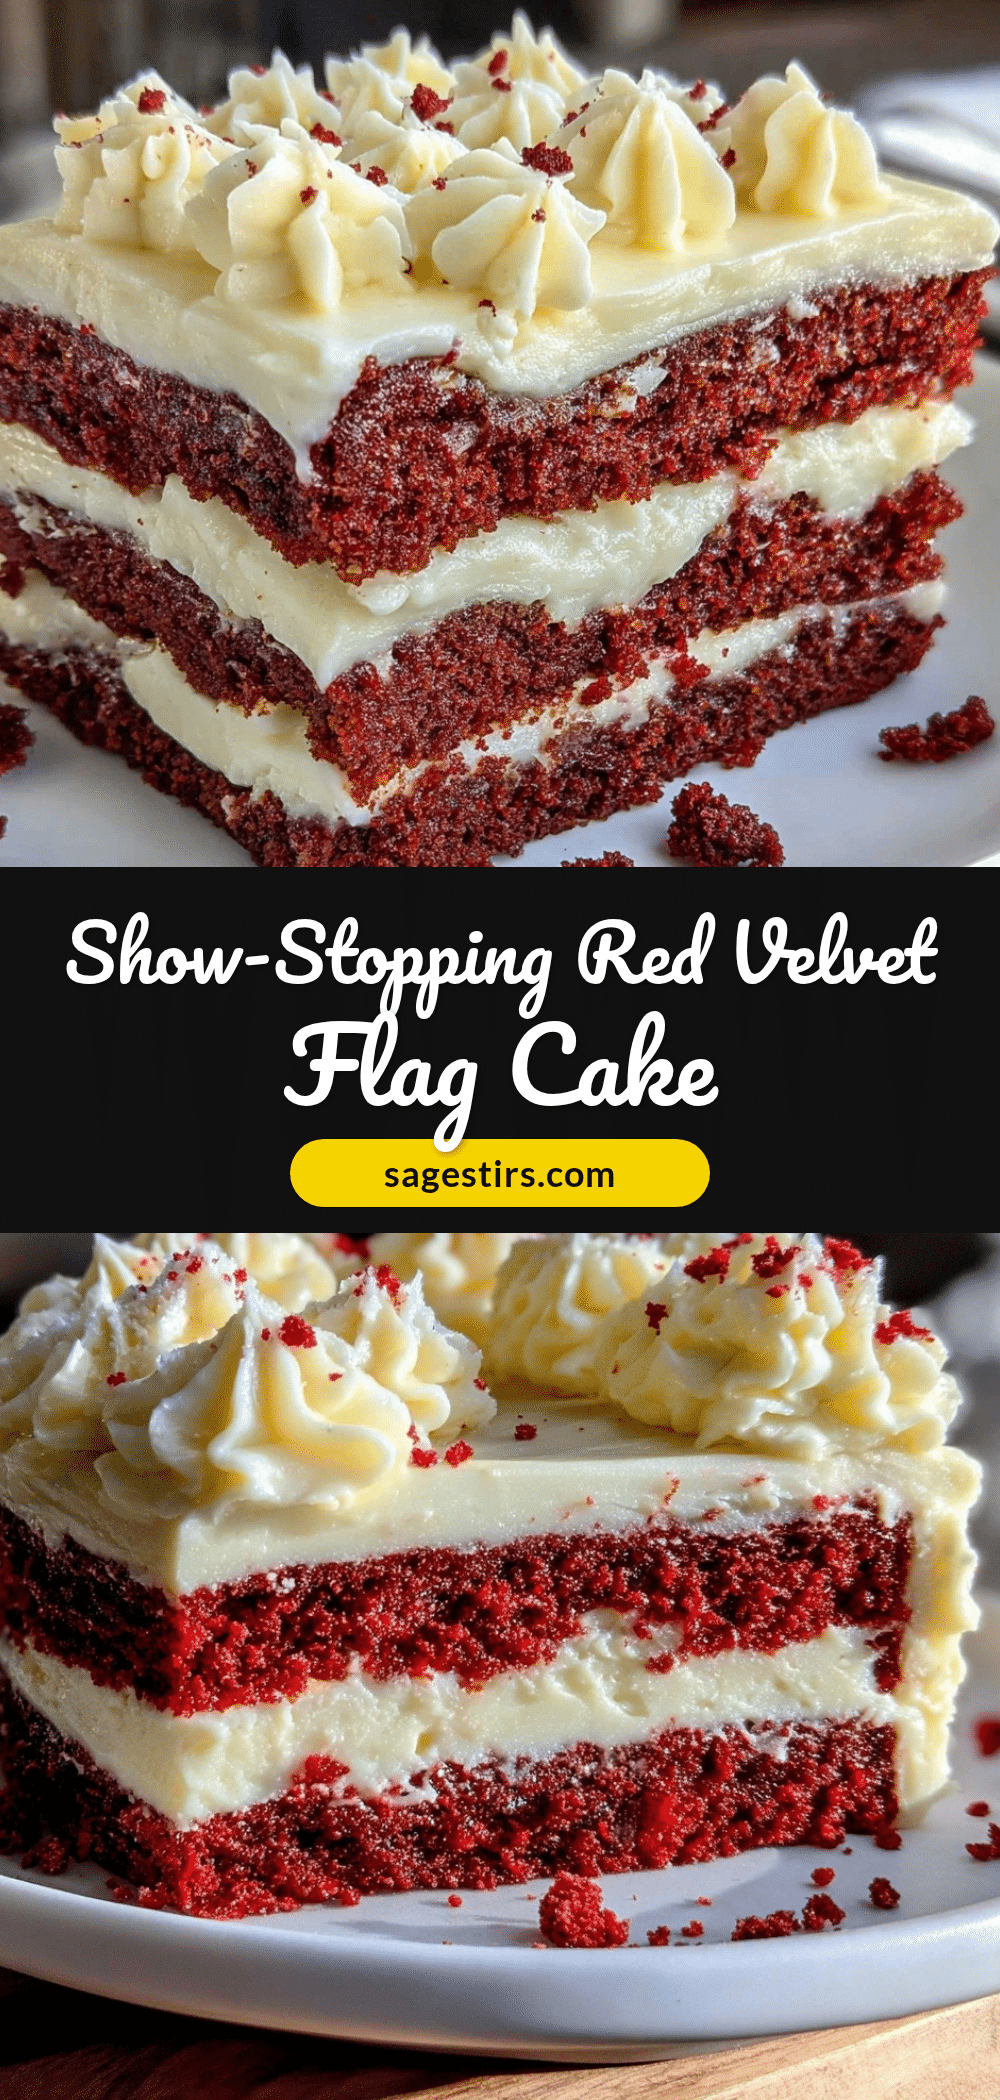
The contrast between the deep red cake layers and the creamy white stars made me pause for a second, thinking maybe I’d stumbled onto something really special. It’s one of those recipes that’s easy enough for a frazzled cook juggling a million things yet impressive enough to earn those “wow” looks around the table. This Perfect Red Velvet Flag Cake with Cream Cheese Stars reminds me there’s room for a little creativity even when time’s tight.
Honestly, it’s become my go-to for patriotic holidays, birthday parties, or any time I want to bring a little joy with minimal stress. The recipe isn’t just about looks—it’s got that classic red velvet tang and moist crumb that makes you close your eyes with the first bite. So here it is, from my chaotic kitchen to yours, a dessert that’s as charming as it is delicious.
Why You’ll Love This Perfect Red Velvet Flag Cake with Cream Cheese Stars
This cake isn’t just a pretty face—it’s a recipe I’ve tested over countless rushed afternoons and family celebrations. Here’s why it stands out:
- Quick & Easy: Ready in about 1 hour and 15 minutes total, including baking and decorating. Perfect for when you realize the party starts soon (trust me, it happens).
- Simple Ingredients: No exotic stuff here—basic pantry staples plus a few dairy items you probably already have.
- Perfect for Patriotic Celebrations: Whether it’s the Fourth of July, Memorial Day, or Veterans Day, this cake nails the festive vibe.
- Crowd-Pleaser: Kids love the stars and stripes design, and adults appreciate the classic red velvet flavor with a smooth cream cheese topping.
- Unbelievably Delicious: The moist, tender crumb contrasts beautifully with the tangy, creamy stars—comfort food that feels special.
What makes this recipe different? It’s the cream cheese stars—yes, I hand-piped them, and yes, they add that extra wow factor without extra fuss. The star shapes are playful but approachable, and the cream cheese frosting is whipped just right to hold shape without being stiff or overly sweet. Plus, the cake layers have a subtle cocoa undertone that deepens the flavor without overpowering the red velvet’s signature tang.
This cake isn’t just a dessert; it’s a little celebration on a plate. It makes me smile every time, and I hope it will do the same for you.
What Ingredients You Will Need
This recipe uses straightforward, wholesome ingredients to deliver bold flavor and a striking look without the fuss. Most are pantry staples or easy to find at any grocery store, making this a go-to for last-minute celebrations.
- For the Red Velvet Cake Layers:
- All-purpose flour – 2 ½ cups (310 grams)
- Cocoa powder (unsweetened) – 2 tablespoons (15 grams)
- Baking soda – 1 ½ teaspoons
- Salt – 1 teaspoon
- Granulated sugar – 1 ½ cups (300 grams)
- Vegetable oil – 1 ½ cups (360 ml) (I prefer canola oil for neutral flavor)
- Large eggs – 3, room temperature
- Buttermilk – 1 cup (240 ml), room temperature (substitute with 1 cup milk + 1 tablespoon lemon juice if needed)
- White vinegar – 1 tablespoon (helps activate the baking soda)
- Vanilla extract – 2 teaspoons
- Red food coloring – 2 tablespoons (gel-based works best for vibrant color without thinning batter)
- For the Cream Cheese Stars:
- Cream cheese – 8 ounces (226 grams), softened (I recommend Philadelphia for smooth texture)
- Unsalted butter – ½ cup (115 grams), softened
- Powdered sugar – 4 cups (480 grams), sifted
- Vanilla extract – 1 teaspoon
- Salt – a pinch (balances sweetness)
If you want to make it dairy-free, swap the cream cheese and butter with vegan alternatives, and use a dairy-free milk plus lemon juice instead of buttermilk. For gluten-free, almond or oat flour blends can work with some texture adjustments (expect a slightly denser crumb).
Equipment Needed
- Two 9-inch (23 cm) round cake pans – standard size works perfectly
- Electric mixer – stand or hand-held for smooth batter and frosting
- Mixing bowls – medium and large sizes for batter and frosting
- Measuring cups and spoons – for precise ingredient amounts
- Rubber spatula – great for folding ingredients gently
- Cooling racks – to cool cake layers evenly
- Piping bag with star tip – for the cream cheese stars (if you don’t have a piping bag, a plastic zip-top bag with a tiny cut corner works fine)
- Offset spatula or butter knife – to smooth frosting between layers
If you don’t have two cake pans, you can bake in batches using one pan, just adjust baking time. I’ve also used silicone pans with success—they’re easier to clean and release the cake well. For piping, I love reusable silicone bags, but disposable ones work just as well and save cleanup time.
Preparation Method
- Preheat and Prep: Set your oven to 350°F (175°C). Grease and flour two 9-inch cake pans or line with parchment paper. This keeps the cakes from sticking and helps them release easily. (Prep time: 10 minutes)
- Mix Dry Ingredients: In a medium bowl, sift together 2 ½ cups all-purpose flour, 2 tablespoons cocoa powder, 1 ½ teaspoons baking soda, and 1 teaspoon salt. This ensures even distribution, which helps the cake rise uniformly.
- Beat Sugar and Oil: In a large mixing bowl, combine 1 ½ cups sugar and 1 ½ cups vegetable oil. Beat on medium speed until well blended, about 1-2 minutes. (Tip: Using a hand mixer here saves your arm from tiring.)
- Add Eggs and Vanilla: Beat in 3 large eggs, one at a time, followed by 2 teaspoons vanilla extract. Mix until smooth and creamy, about 2 minutes. This step adds volume and helps the cake hold together.
- Incorporate Food Coloring: Mix in 2 tablespoons gel red food coloring until the batter is a rich, even red. (If you use liquid food coloring, the batter may thin out slightly—gel is best for color vibrancy.)
- Alternate Adding Dry Ingredients and Buttermilk: Add the dry ingredients in three parts, alternating with 1 cup buttermilk and 1 tablespoon white vinegar. Start and end with dry ingredients. Mix on low speed until just combined to avoid a dense cake. (Total mixing time here: 2-3 minutes)
- Divide Batter and Bake: Pour batter evenly into prepared pans, smoothing tops with a spatula. Bake for 28-32 minutes, or until a toothpick inserted in the center comes out clean. Rotate pans halfway through baking for even cooking.
- Cool Completely: Let cakes cool in pans for 10 minutes, then turn out onto cooling racks. Wait until completely cool before frosting—warm cake will melt your cream cheese stars.
- Make Cream Cheese Frosting: Beat 8 ounces softened cream cheese and ½ cup softened unsalted butter together until smooth and fluffy, about 3 minutes. Gradually add 4 cups powdered sugar, 1 teaspoon vanilla extract, and a pinch of salt. Beat until creamy and spreadable.
- Layer and Frost Cake: Place one cake layer on your serving plate. Spread a thin layer of frosting on top. Carefully place the second cake layer on top. Frost the entire cake with a thin crumb coat, then chill for 30 minutes to set.
- Pipe Cream Cheese Stars: Fill a piping bag fitted with a star tip with the remaining frosting. Pipe stars evenly across the top of the cake in rows to mimic the flag’s star field. The rest of the cake can be frosted smooth or decorated with stripes of leftover frosting.
Pro tip: If you want the stars to hold shape better, chill the frosting for 15 minutes before piping. Also, keep your hands steady—practice piping stars on parchment paper if you’re nervous.
Cooking Tips & Techniques
Making the Perfect Red Velvet Flag Cake requires a few little tricks I picked up after a handful of kitchen mishaps. First, always sift your dry ingredients. It might feel like an extra step, but it gives the cake that light, tender crumb instead of a dense, heavy mess.
Don’t overmix the batter. Once you add the dry ingredients, mix until just combined. Overworking the batter develops gluten and makes the cake tough. I learned this the hard way after a chewy red velvet disaster.
For the cream cheese frosting, make sure both the butter and cream cheese are softened but not melted. If they’re too warm, the frosting gets runny and won’t hold those star shapes. Chill the frosting slightly before piping if your kitchen is warm.
When piping stars, steady pressure is your friend. Hold the bag perpendicular to the cake surface, squeeze firmly, then lift straight up to form a clean star. Don’t rush—taking your time here pays off visually.
Lastly, layering is key. A thin crumb coat before the final frosting helps seal in crumbs and gives you a smooth canvas for stars. Chill the cake between coats to avoid smudging.
Variations & Adaptations
Getting creative with this cake turns it into something fresh every time. Here are a few variations to try:
- Blueberry Stars: For a naturally colored twist, swap cream cheese stars for blueberry dollops or a blueberry compote swirl. It adds a fresh burst of flavor and a slightly rustic look.
- Gluten-Free Version: Use a gluten-free flour blend. I recommend a mix with xanthan gum for structure. Bake times may vary slightly, so keep an eye on the cake’s doneness.
- Vegan Adaptation: Replace eggs with flax eggs (1 tablespoon ground flaxseed + 3 tablespoons water per egg), use dairy-free cream cheese and butter alternatives, and plant-based milk with lemon juice as buttermilk substitute.
- Mini Flag Cupcakes: Bake the batter in cupcake tins and pipe small cream cheese stars on each for easy, individual servings perfect for picnics or school parties.
For a personal spin, I once swapped the cream cheese stars for whipped mascarpone mixed with a touch of honey—less sweet, richer, and surprisingly delightful paired with the red velvet layers.
Serving & Storage Suggestions
Serve this cake at room temperature for the best flavor and texture—the cream cheese stars soften slightly and become silky. If you’re serving outdoors, keep it chilled until about 30 minutes before eating to maintain structure.
Pair it with a light beverage like iced tea or a sparkling berry lemonade to balance the richness. For a festive brunch, it sits nicely alongside savory staples like the creamy honey butter corn casserole or a simple egg dish like the light veggie-packed egg white scramble.
Store leftovers covered tightly in the fridge for up to 4 days. The cake keeps moist, and the cream cheese stars stay fresh. For longer storage, freeze wrapped in plastic wrap and foil for up to 2 months. Thaw overnight in the fridge before serving.
Reheat slices gently in the microwave for 10-15 seconds if you want a slightly warmer bite, but avoid overheating to keep the frosting from melting.
Nutritional Information & Benefits
A typical slice of this red velvet flag cake (1/12th of the cake) contains approximately:
| Nutrient | Amount |
|---|---|
| Calories | 350-400 kcal |
| Fat | 18-22 g |
| Carbohydrates | 45-50 g |
| Protein | 4-6 g |
| Sugar | 35-40 g |
The cream cheese adds a good source of calcium and protein, and using buttermilk contributes to a tender crumb with a slight tang that aids digestion. While this cake is indulgent, the portion size and simple ingredients make it a reasonable treat for special occasions.
For dietary considerations, this cake contains dairy, eggs, and gluten. Substitutions mentioned earlier can accommodate many common allergies and preferences.
Conclusion
The Perfect Red Velvet Flag Cake with Cream Cheese Stars is more than just a festive dessert—it’s a recipe that came from the chaos of real life and turned into a family favorite. It’s approachable, fun, and packs that classic red velvet flavor with a creamy twist you’ll find yourself craving again.
Feel free to add your own spin to the stars and stripes, whether piping with blueberry dollops or trying mini cupcakes for easy sharing. I love how this cake brings a little extra joy and color to the table, no matter the occasion.
If you give it a try, I’d love to hear how your flag cake turned out and any creative touches you added. Baking is better when shared, after all.
FAQs about the Perfect Red Velvet Flag Cake with Cream Cheese Stars
Can I make this cake ahead of time?
Yes! Bake the cake layers up to two days in advance and store wrapped tightly in plastic wrap. You can make the frosting a day ahead as well and refrigerate. Assemble and decorate the day you plan to serve.
What if I don’t have buttermilk?
No worries. Use 1 cup of milk with 1 tablespoon of lemon juice or white vinegar, let it sit for 5 minutes, and it works as a buttermilk substitute.
How do I get vibrant red color without artificial food coloring?
Natural alternatives like beet juice or powder can be used, but they may slightly alter flavor and color intensity. Gel food coloring remains the best for vivid red velvet.
Can I use this frosting for other cakes?
Absolutely! The cream cheese star frosting is versatile and delicious on carrot cake, spice cake, or even simple vanilla cakes.
How do I store leftover decorated cake?
Keep it covered in the fridge for up to 4 days. Bring to room temperature before serving for best flavor and texture.
Pin This Recipe!
Perfect Red Velvet Flag Cake with Cream Cheese Stars
A festive and easy-to-make red velvet cake decorated with hand-piped cream cheese stars, perfect for patriotic celebrations and special occasions.
- Prep Time: 20 minutes
- Cook Time: 30 minutes
- Total Time: 1 hour 15 minutes
- Yield: 12 servings 1x
- Category: Dessert
- Cuisine: American
Ingredients
- 2 ½ cups (310 grams) all-purpose flour
- 2 tablespoons (15 grams) unsweetened cocoa powder
- 1 ½ teaspoons baking soda
- 1 teaspoon salt
- 1 ½ cups (300 grams) granulated sugar
- 1 ½ cups (360 ml) vegetable oil (canola oil preferred)
- 3 large eggs, room temperature
- 1 cup (240 ml) buttermilk, room temperature (or 1 cup milk + 1 tablespoon lemon juice as substitute)
- 1 tablespoon white vinegar
- 2 teaspoons vanilla extract
- 2 tablespoons gel red food coloring
- 8 ounces (226 grams) cream cheese, softened
- ½ cup (115 grams) unsalted butter, softened
- 4 cups (480 grams) powdered sugar, sifted
- 1 teaspoon vanilla extract
- Pinch of salt
Instructions
- Preheat oven to 350°F (175°C). Grease and flour two 9-inch cake pans or line with parchment paper.
- In a medium bowl, sift together flour, cocoa powder, baking soda, and salt.
- In a large bowl, beat sugar and vegetable oil on medium speed until well blended, about 1-2 minutes.
- Beat in eggs one at a time, then add vanilla extract and mix until smooth and creamy, about 2 minutes.
- Mix in red gel food coloring until batter is evenly colored.
- Add dry ingredients in three parts, alternating with buttermilk and white vinegar, starting and ending with dry ingredients. Mix on low speed until just combined.
- Divide batter evenly between prepared pans and smooth tops. Bake for 28-32 minutes or until a toothpick inserted in the center comes out clean. Rotate pans halfway through baking.
- Cool cakes in pans for 10 minutes, then turn out onto cooling racks and cool completely.
- Beat cream cheese and butter together until smooth and fluffy, about 3 minutes. Gradually add powdered sugar, vanilla extract, and salt. Beat until creamy and spreadable.
- Place one cake layer on serving plate and spread a thin layer of frosting on top. Place second layer on top and frost entire cake with a thin crumb coat. Chill for 30 minutes to set.
- Fill a piping bag fitted with a star tip with remaining frosting and pipe stars evenly across the top of the cake to mimic the flag’s star field. Frost the rest of the cake smooth or decorate with stripes of leftover frosting.
Notes
Use gel-based red food coloring for best color without thinning batter. Chill frosting before piping stars to help them hold shape. Do not overmix batter after adding dry ingredients to avoid toughness. For dairy-free or vegan versions, substitute cream cheese, butter, and buttermilk with plant-based alternatives. Gluten-free flour blends with xanthan gum can be used but expect a denser crumb.
Nutrition
- Serving Size: 1 slice (1/12th of c
- Calories: 375
- Sugar: 38
- Sodium: 300
- Fat: 20
- Saturated Fat: 8
- Carbohydrates: 48
- Fiber: 1
- Protein: 5
Keywords: red velvet cake, cream cheese frosting, patriotic cake, Fourth of July dessert, flag cake, easy red velvet, homemade cake, festive dessert