Love this? Save it for later!
Share the inspiration with your friends
“Are these… actually crispy?” My husband leaned over my shoulder, skeptical. I had just pulled the basket out of my air fryer, and honestly, I was holding my breath too. We had been down this road before—oven-baked thighs that promised crunch but delivered sad, flabby skin. But this time was different. The skin crackled when I poked it. It sounded like good fried chicken, but without the vat of oil and the mess. I plated one, and he didn’t say another word for a solid minute. That was the moment I knew the recipe was a keeper.
I had been testing air fryer chicken for weeks. I wanted that deep golden crust, the kind that shatters when you bite into it, but I also wanted juicy meat underneath. Not dry, not rubbery—just perfect. This garlic herb rub was my third attempt, and I almost scrapped it because I thought the herbs would burn in the air fryer. Turns out, I was wrong. The garlic stays fragrant, the herbs toast just enough to get aromatic, and the skin? It gets stupidly crispy. You know how some recipes say “crispy” and then you take a bite and it’s just… brown? This isn’t that.
These crispy air fryer chicken thighs have become our go-to weeknight dinner. They’re fast, they’re forgiving, and they make the whole kitchen smell like a Sunday roast. I honestly don’t think I’ll ever bake chicken thighs in the oven again. Why would I? This takes half the time and delivers way better texture. So if you’ve been burned by soggy air fryer chicken before, I get it. But trust me on this one.
Why You’ll Love This Recipe
Let me tell you why this one stands out from the crowd. I’ve tested more chicken recipes than I care to count, and this is the one I keep coming back to. It’s not just good—it’s the kind of good that makes you text a friend a photo mid-bite.
- Quick & Easy: From fridge to plate in under 30 minutes. No marinating, no brining, no complicated steps. Just rub and cook.
- Simple Ingredients: You probably have all the spices in your cabinet right now. Garlic powder, onion powder, paprika, dried herbs—pantry staples that do the heavy lifting.
- Perfect for Busy Weeknights: This is the dinner you make when you forgot to thaw anything. It works with fresh or thawed thighs, and it’s ready before you finish scrolling through takeout options.
- Crowd-Pleaser: Kids love it because it tastes like fried chicken. Adults love it because it’s not fried chicken. Everyone wins.
- Unbelievably Crispy: No breading, no flour, no cornstarch. Just the magic of the air fryer and the right rub. The skin gets shatteringly crisp while the meat stays juicy.
What makes this recipe different from all the others? It’s the technique. Most recipes tell you to just toss the thighs in and hope for the best. But I learned the hard way that temperature, timing, and placement matter. I’ve burned my fair share of garlic, dried out plenty of chicken, and ended up with sad, pale skin more times than I’d like to admit. This method is the result of all those failures. It’s tested, it’s reliable, and it works every single time.
And honestly? This is comfort food at its finest. It’s the kind of meal that makes you close your eyes after the first bite. The kind that makes you forget you were having a rough day. It’s simple, it’s satisfying, and it’s exactly what dinner should be.
What Ingredients You Will Need
This recipe uses simple, wholesome ingredients to deliver bold flavor and satisfying crunch without any fuss. Most of these are pantry staples, which means you can whip this up without a special trip to the store.
For the Garlic Herb Rub
- 2 teaspoons garlic powder (not garlic salt—we’ll control the salt separately)
- 1 teaspoon onion powder (adds a subtle sweetness that balances the garlic)
- 1 teaspoon smoked paprika (I prefer smoked over sweet here—it adds that deep, almost bacon-like flavor)
- 1 teaspoon dried thyme (or 1 tablespoon fresh, finely chopped)
- 1 teaspoon dried rosemary (crush it between your fingers to release the oils)
- 1 teaspoon dried oregano (Italian or Greek—both work great)
- ½ teaspoon black pepper (freshly ground if you can, but pre-ground works too)
- 1 teaspoon salt (use kosher or sea salt—table salt is saltier, so adjust if needed)
For the Chicken
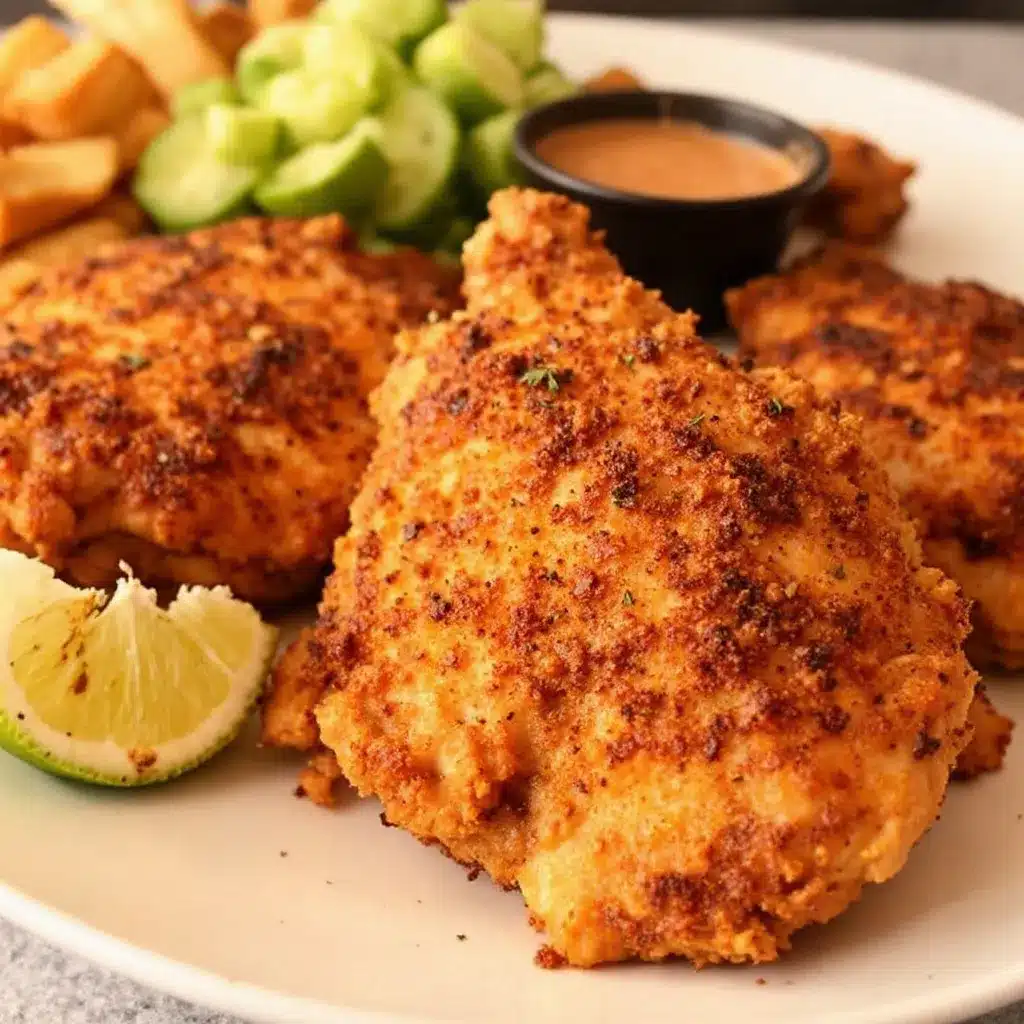
- 4 bone-in, skin-on chicken thighs (about 1.5 to 2 pounds total—you can use boneless, but the skin gets crispier with bone-in)
- 1 tablespoon olive oil (avocado oil works too—just don’t use butter, it burns in the air fryer)
Ingredient Tips & Substitutions
- Chicken thighs: I really recommend bone-in, skin-on for the best texture. The bone keeps the meat moist, and the skin is what gets that incredible crunch. If you only have boneless, reduce the cooking time by about 5 minutes and check for doneness early.
- Paprika: Smoked paprika is my favorite here, but regular sweet paprika works too. If you want heat, you can swap in chipotle powder or add a pinch of cayenne to the rub.
- Dried herbs: Fresh herbs are lovely, but they burn more easily in the air fryer. If you want to use fresh, double the amount and add them halfway through cooking to prevent scorching. I personally stick with dried for this recipe—it’s just easier and more forgiving.
- Oil: Don’t skip this! The oil helps the rub stick and encourages browning. A little goes a long way—you just need enough to coat the skin lightly.
Equipment Needed
You don’t need much for this recipe, which is part of the beauty. Here’s what you’ll need:
- Air fryer: Any brand works—I use a 5.8-quart Cosori, but I’ve tested this in smaller and larger models too. Just make sure the thighs aren’t crowded in the basket. If your air fryer is small, cook in batches.
- Mixing bowl: A small bowl for the rub and a larger one for tossing the chicken.
- Tongs: For flipping the chicken halfway through. Metal or silicone—both work.
- Meat thermometer: This is non-negotiable for me. Chicken thighs are done at 165°F, but I pull them at 170°F for the best texture. A thermometer takes the guesswork out.
- Paper towels: For patting the chicken dry. This is the most important step for crispy skin—don’t skip it!
- Cutting board and knife: If you’re using fresh herbs, you’ll need these. Otherwise, you can skip them.
If you don’t have an air fryer yet, I honestly think this recipe is worth buying one for. But if you’re not ready to commit, you can make these in the oven at 425°F on a wire rack set over a baking sheet. They’ll take about 30-35 minutes, and you’ll need to flip them halfway. The skin won’t be quite as crispy, but it’ll still be good.
Preparation Method
Alright, let’s get cooking. This is the part where I walk you through every step, including the little things I learned the hard way.
Step 1: Pat the Chicken Dry
Take your chicken thighs out of the package and pat them thoroughly dry with paper towels. I mean really dry—get in between the skin and the meat if you can, and press firmly to absorb as much moisture as possible. This is the single most important step for crispy skin. Wet skin steams instead of crisps. I learned this after my first batch came out looking pale and sad.
Step 2: Make the Rub
In a small bowl, combine the garlic powder, onion powder, smoked paprika, dried thyme, dried rosemary, dried oregano, black pepper, and salt. Stir it all together with a fork. Smell it—it should be fragrant and herbaceous. If it doesn’t smell like much, your spices might be old. Fresh spices make a huge difference here.
Step 3: Season the Chicken
Drizzle the olive oil over the chicken thighs and use your hands to rub it all over the skin. Don’t forget the underside! Then sprinkle the rub generously over both sides. Use all of it—don’t hold back. Massage it into the skin, getting into every nook and cranny. Let the chicken sit at room temperature for 10 minutes while your air fryer preheats. This helps the flavors meld and the chicken cook more evenly.
Step 4: Preheat the Air Fryer
Set your air fryer to 380°F (190°C) and let it preheat for 3-5 minutes. Most air fryers recommend preheating, and it really does make a difference for even cooking. If your model doesn’t have a preheat function, just run it empty for 3 minutes.
Step 5: Arrange the Chicken in the Basket
Place the chicken thighs skin-side down in the air fryer basket. Make sure they’re not touching—leave a little space between each piece for air to circulate. If they’re crowded, they’ll steam instead of crisp. I can usually fit 4 thighs in my 5.8-quart basket. If you have more, cook them in batches.
Step 6: Cook the First Side
Cook at 380°F for 12 minutes. Don’t open the basket during this time—you’ll let out all the hot air. The skin should be starting to turn golden brown and crispy on the bottom.
Step 7: Flip and Finish Cooking
Using tongs, carefully flip the chicken thighs skin-side up. Cook for another 10-12 minutes at 380°F. The skin should be deep golden brown, crispy, and crackling. The internal temperature should read 170°F when you insert a meat thermometer into the thickest part of the thigh (avoiding the bone). If it’s not quite there, cook for another 2-3 minutes and check again.
Step 8: Rest and Serve
Remove the chicken from the air fryer and let it rest on a cutting board or plate for 5 minutes. This is crucial—the juices need to redistribute. If you cut into it too soon, all that goodness will run out onto the board. After 5 minutes, serve immediately.
Cooking Tips & Techniques
I’ve made this recipe probably 20 times by now, and I’ve learned a few things along the way. Here are my best tips for perfect crispy air fryer chicken thighs every time.
Don’t Skip the Drying Step
I know I said this already, but it’s worth repeating. Moisture is the enemy of crispy skin. If you’re in a rush, you can pat the chicken dry and then let it sit uncovered in the fridge for 30 minutes to air-dry. That extra step makes the skin even crispier. I do this when I’m planning ahead.
Watch the Temperature
380°F is my sweet spot. Higher temperatures can burn the herbs and garlic before the chicken is cooked through. Lower temperatures won’t get the skin crispy enough. If your air fryer runs hot (some do), reduce the temperature to 370°F and add a couple of minutes to the cooking time.
Don’t Crowd the Basket
This is the second most common mistake. If the thighs are touching, the air can’t circulate, and you’ll end up with unevenly cooked chicken. Leave at least ½ inch of space between each piece. If you have to cook in batches, do it. The extra 10 minutes is worth it.
Let the Chicken Rest
I know it’s tempting to dig in right away, but resting is non-negotiable. The juices need time to settle back into the meat. If you cut into it too soon, you’ll have dry chicken and a puddle of juice on your plate. Five minutes is all it takes.
Use a Meat Thermometer
Chicken thighs are forgiving, but they can still be overcooked. I pull mine at 170°F for the juiciest results. Anything above 175°F starts to dry out. A good instant-read thermometer is worth its weight in gold.
Variations & Adaptations
One of the best things about this recipe is how easy it is to customize. Here are a few variations I’ve tried and loved.
Spicy Version
Add ½ teaspoon of cayenne pepper to the rub, or swap the smoked paprika for chipotle powder. You can also sprinkle red pepper flakes over the finished chicken for extra heat. My husband loves this version—he says it reminds him of Nashville hot chicken.
Lemon Herb Version
Add the zest of one lemon to the rub and squeeze the juice over the chicken before serving. It brightens up the flavor and pairs beautifully with the herbs. I like to serve this version with a side of roasted vegetables.
Garlic Butter Finish
After the chicken comes out of the air fryer, brush it with melted butter mixed with minced garlic and a squeeze of lemon. It adds richness and a glossy finish. This is my go-to for when I’m serving guests.
Boneless Skinless Version
If you’re watching your fat intake, you can use boneless, skinless thighs. Reduce the cooking time to 10-12 minutes total (flip halfway) and check for doneness at 165°F. The texture won’t be as crispy, but the flavor will still be there.
Different Herb Blends
Try using Italian seasoning, herbes de Provence, or even a store-bought poultry seasoning blend. Each one gives a slightly different flavor profile. I’ve used a za’atar blend before, and it was incredible—earthy, tangy, and aromatic.
Serving & Storage Suggestions
These crispy air fryer chicken thighs are incredibly versatile. Here’s how I like to serve and store them.
Serving Suggestions
Serve the chicken hot, right after resting. The skin is at its crispiest within the first 15 minutes. I love pairing these thighs with simple sides that don’t compete with the flavor. A crisp green salad with lemon vinaigrette, roasted asparagus, or garlic mashed potatoes are all excellent choices. For a low-carb option, try cauliflower rice or roasted broccoli. And if you’re feeling indulgent, a side of creamy garlic parmesan pasta salad is absolutely divine with this chicken.
Storage Instructions
Store any leftover chicken in an airtight container in the refrigerator for up to 4 days. The skin will lose its crispiness, but the meat will stay juicy. To reheat, I recommend using the air fryer again at 350°F for 3-4 minutes. The microwave will make the skin soggy, so avoid it if you can. The oven at 375°F for 8-10 minutes works too, but the air fryer is best.
Freezing Instructions
You can freeze the cooked chicken for up to 3 months. Let it cool completely, then wrap each thigh individually in plastic wrap and place them in a freezer-safe bag. To reheat, thaw in the refrigerator overnight and then crisp up in the air fryer at 350°F for 5-6 minutes. The flavor holds up beautifully.
How Flavors Develop Over Time
Honestly, the chicken tastes even better the next day. The herbs and garlic have more time to meld, and the meat becomes even more tender. I often make a double batch just for leftovers. Cold chicken thighs are great sliced over salads or shredded into tacos.
Nutritional Information & Benefits
Here’s a rough estimate of the nutritional breakdown per serving (one chicken thigh with skin):
- Calories: 280-320
- Protein: 25-28g
- Fat: 18-22g
- Carbohydrates: 2-3g
- Fiber: 0.5g
- Sugar: 0g
Health Benefits
Chicken thighs are a great source of high-quality protein, iron, and B vitamins. The skin contains healthy fats that help with nutrient absorption. Garlic and herbs are packed with antioxidants and anti-inflammatory compounds. This recipe is also naturally gluten-free, low-carb, and keto-friendly. If you’re watching your sodium, you can reduce the salt in the rub or use a salt-free herb blend.
Dietary Considerations
- Gluten-Free: Yes, all ingredients are naturally gluten-free
- Low-Carb/Keto: Yes, with only 2-3g of carbs per serving
- Dairy-Free: Yes, no dairy in this recipe
- Nut-Free: Yes, safe for nut allergies
- Paleo: Yes, if you use a paleo-friendly oil like avocado or coconut
I personally love that this recipe fits into so many different eating styles. It’s one of those dishes that works for almost everyone at the table, which makes it perfect for family dinners or potlucks.
FAQs
Can I use chicken breasts instead of thighs?
You can, but the results won’t be as juicy. Chicken breasts are leaner and dry out more easily in the air fryer. If you want to try it, use boneless, skinless breasts and cook at 380°F for 10-12 minutes, flipping halfway. Check the internal temperature at 165°F. I’d recommend pounding the breasts to an even thickness first for the best results.
Why is my air fryer chicken not crispy?
There are a few common culprits. First, the chicken might not have been dried thoroughly enough. Second, the basket might have been too crowded, causing the chicken to steam instead of crisp. Third, the temperature might have been too low. Try patting the chicken extra dry, leaving space between pieces, and cooking at 380°F. If you’re still having trouble, try adding a light dusting of baking powder to the rub—it helps with browning.
Can I make this recipe ahead of time?
Yes, but the skin is best fresh. If you need to prep ahead, you can season the chicken and store it in the refrigerator for up to 24 hours before cooking. This actually helps the flavors penetrate deeper. Just let it sit at room temperature for 10 minutes before air frying. If you’re cooking for a party, you can cook the chicken earlier in the day and reheat it in the air fryer just before serving.
How do I clean my air fryer after cooking chicken?
Let the air fryer cool completely, then remove the basket and wash it with warm soapy water. A non-abrasive sponge works best. If there’s stuck-on residue, soak the basket in hot water for 10 minutes before scrubbing. I also wipe down the inside of the air fryer with a damp cloth to remove any grease splatters. Regular cleaning keeps your air fryer working well and prevents smoke from old grease.
Can I use frozen chicken thighs?
I don’t recommend it for this recipe. Frozen chicken releases a lot of moisture as it thaws, which makes it nearly impossible to get crispy skin. If you only have frozen thighs, thaw them completely in the refrigerator overnight, then pat them extra dry before seasoning. You might need to add a couple of minutes to the cooking time. For a quick weeknight meal, I always keep fresh or thawed chicken on hand.
Conclusion
These crispy air fryer chicken thighs have honestly changed the way I think about weeknight dinners. They’re fast, they’re forgiving, and they deliver that deep, satisfying crunch that makes you feel like you’re eating something indulgent—even though it’s actually pretty healthy. The garlic herb rub is simple enough to throw together on a busy Tuesday, but flavorful enough to serve to guests without embarrassment.
I hope you give this recipe a try and make it your own. Maybe you’ll add a little extra garlic, or swap in your favorite herb blend. Maybe you’ll serve it with cozy slow cooker fall harvest beef stew on a chilly evening, or alongside a fresh green salad in the summer. However you customize it, I promise it’ll be good.
If you make these crispy air fryer chicken thighs, I’d love to hear about it. Leave a comment below and let me know how they turned out, or tag me in your photos. Did you try a variation? Did your family love them? Tell me everything. And if you’re looking for more easy weeknight dinner ideas, check out our crispy one-pan garlic butter chicken thighs or our easy crockpot honey garlic chicken for another crowd-pleasing option.
Until next time, happy cooking!
Pin This Recipe!

Easy Crispy Air Fryer Chicken Thighs with Garlic Herb Rub

These crispy air fryer chicken thighs are fast, forgiving, and deliver a deep golden crust with juicy meat underneath. Made with a simple garlic herb rub, they’re perfect for busy weeknights and taste like fried chicken without the mess.
- Prep Time: 10 minutes
- Cook Time: 22-24 minutes
- Total Time: 32-34 minutes
- Yield: 4 servings 1x
- Category: Main Course
- Cuisine: American
Ingredients
- 2 teaspoons garlic powder
- 1 teaspoon onion powder
- 1 teaspoon smoked paprika
- 1 teaspoon dried thyme
- 1 teaspoon dried rosemary
- 1 teaspoon dried oregano
- ½ teaspoon black pepper
- 1 teaspoon salt
- 4 bone-in, skin-on chicken thighs (about 1.5 to 2 pounds total)
- 1 tablespoon olive oil
Instructions
- Pat the chicken thighs thoroughly dry with paper towels, getting in between the skin and meat if possible.
- In a small bowl, combine garlic powder, onion powder, smoked paprika, dried thyme, dried rosemary, dried oregano, black pepper, and salt. Stir together.
- Drizzle olive oil over the chicken thighs and rub it all over the skin and underside. Sprinkle the rub generously over both sides and massage it in. Let sit at room temperature for 10 minutes while the air fryer preheats.
- Preheat the air fryer to 380°F (190°C) for 3-5 minutes.
- Place the chicken thighs skin-side down in the air fryer basket, leaving space between each piece. Cook at 380°F for 12 minutes without opening the basket.
- Flip the chicken thighs skin-side up using tongs. Cook for another 10-12 minutes at 380°F until the skin is deep golden brown and the internal temperature reaches 170°F.
- Remove the chicken from the air fryer and let it rest for 5 minutes before serving.
Notes
Pat the chicken very dry for the crispiest skin. Do not crowd the basket; cook in batches if needed. Let the chicken rest for 5 minutes after cooking. For boneless skinless thighs, reduce cooking time to 10-12 minutes total and check for doneness at 165°F. The rub can be made ahead and stored in an airtight container.
Nutrition
- Serving Size: 1 chicken thigh with
- Calories: 300
- Sodium: 600
- Fat: 20
- Saturated Fat: 5
- Carbohydrates: 2.5
- Fiber: 0.5
- Protein: 26
Keywords: air fryer chicken thighs, crispy chicken thighs, garlic herb chicken, easy weeknight dinner, gluten-free chicken, keto chicken



