Love this? Save it for later!
Share the inspiration with your friends
It is just past midnight, and the house is finally still. The last trick-or-treaters have long since gone home, their buckets dumped onto the kitchen island, the candy wrappers crinkling in the dim light of the refrigerator. I am sitting at the counter, a single candle flickering beside me, and the only thing I want is the quiet satisfaction of finishing these spiderweb sugar cookies. The dough is chilled, firm and cool to the touch, ready to be rolled out into perfect circles. There is a specific kind of peace in this hour, when the world outside feels distant and the only sound is the scrape of a rolling pin against flour-dusted marble.
I remember the first time I tried to make spiderweb designs. I was rushing, trying to finish before guests arrived, and the result looked less like a delicate web and more like a plate of spaghetti. I was frustrated, honestly, because I wanted them to look magical, not messy. But this time, I am not rushing. I have all night. The white icing is thick, holding its shape on the spoon, and the black food coloring is ready to be dragged through it with a toothpick. It feels like a secret project, one that belongs only to the quiet hours and the moonlight filtering through the window.
These cookies are not just for Halloween. They are for the people who stay up late, who find comfort in the repetitive motion of piping and decorating. They are for the ones who appreciate the thin line between spooky and beautiful. When you drag that toothpick through the icing, you are creating something intricate from something simple. It is a small ritual, but it grounds me. The smell of vanilla and sugar fills the kitchen, warm and inviting, pushing away the chill of the autumn night.
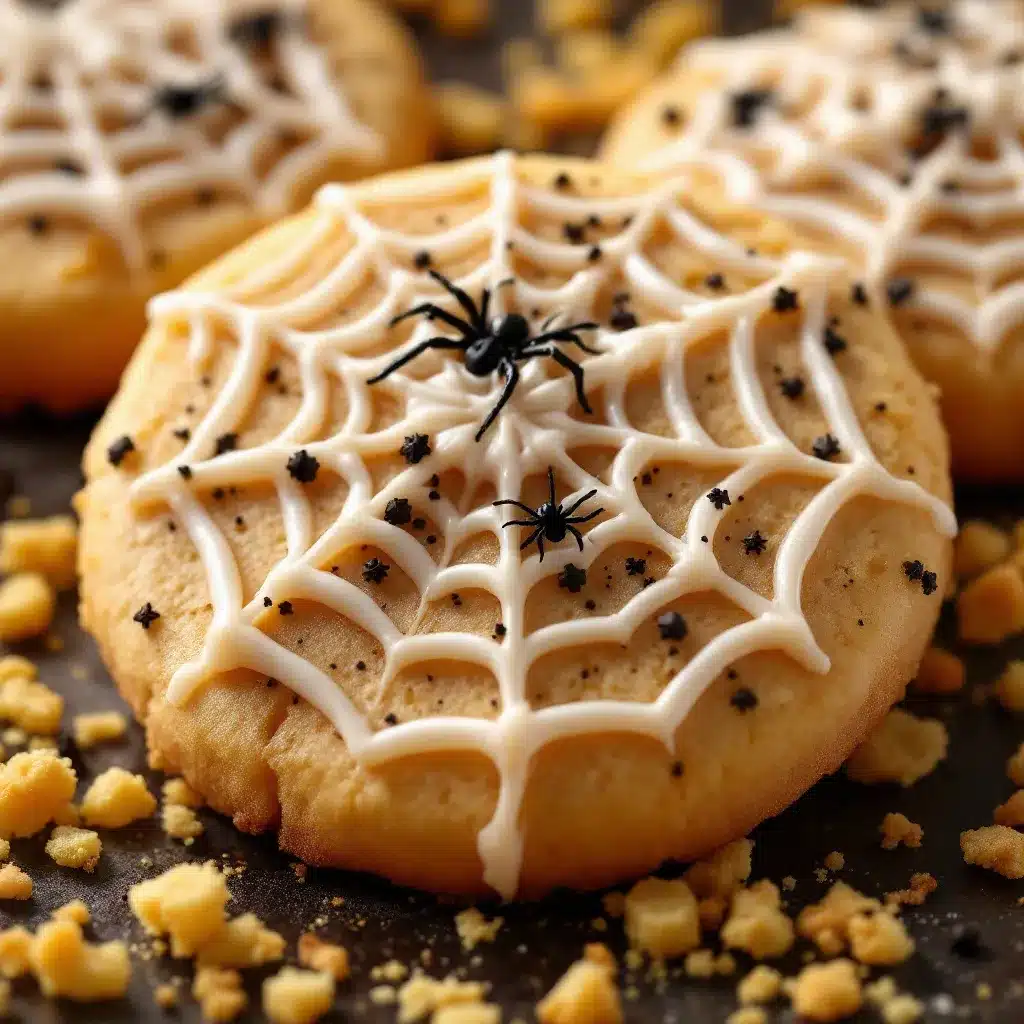
There is something deeply satisfying about watching the black lines radiate outward, forming that classic, creepy-crawly pattern. It is hypnotic. I find myself getting lost in the process, forgetting about tomorrow’s emails or the chores waiting in the hallway. For these few hours, it is just me, the dough, and the icing. And when the cookies are finally set, glossy and perfect, there is a quiet pride that settles in my chest. It is not a loud victory, but a steady, warm one.
Why You’ll Love This Recipe
Let’s be honest, sugar cookies can be tricky. Some are too crumbly, others too hard, and many lack that tender melt-in-your-mouth quality we all crave. I have spent years testing doughs, adjusting butter ratios, and learning from my flour-dusted failures to create a version that is reliable and delicious. This recipe is the result of countless batches, each one bringing me closer to the perfect balance of structure and softness. It is designed to hold its shape during baking but remain tender enough to break apart with a gentle bite.
Here is why this specific recipe stands out from the rest:
- Perfect Texture Every Time: The dough is rolled out thick enough to handle the decorating stress but thin enough to bake through evenly. You get that classic snap when you bite into it, followed by a soft, sugary interior.
- Simple, Pantry-Friendly Ingredients: You do not need fancy flours or exotic extracts. Standard all-purpose flour, unsalted butter, and vanilla extract are all you need. This means no special grocery trips on a busy Tuesday.
- Visual Impact with Minimal Effort: The spiderweb design looks incredibly complex and professional, but it is actually quite simple once you know the trick. It is the ultimate “look what I made” cookie that hides how easy it really is.
- Make-Ahead Friendly: These cookies can be baked days in advance and stored in an airtight container. The icing sets firmly, making them perfect for party platters or gift boxes without worrying about them smudging.
- Kid-Friendly Activity: While the web design requires a steady hand, the rolling and cutting can be done by little helpers. It is a great way to get them involved in the kitchen without the mess of raw dough everywhere.
What makes this recipe different is the attention to the icing consistency. Many recipes fail here because the icing is too thin, causing the web pattern to bleed. I have tested the ratio of powdered sugar to liquid to ensure it holds its peak, allowing the toothpick to drag through cleanly without merging the colors. It is a small detail, but it makes all the difference in achieving that crisp, spooky look.
This recipe is also versatile. While Halloween is the obvious occasion, these cookies work beautifully for any themed party or just because. They are the kind of treat that makes you close your eyes after the first bite, savoring the sweet vanilla flavor. It is comfort food reimagined for the spooky season—fun, festive, but with the same soul-soothing satisfaction as a classic sugar cookie. Whether you are impressing guests at a costume party or just treating yourself to a midnight snack, these cookies deliver.
What Ingredients You Will Need
This recipe relies on high-quality, simple ingredients to deliver bold flavor and a professional-looking finish. The beauty of sugar cookies lies in the purity of their components. Since there are no spices or complex mix-ins, every ingredient needs to be fresh and measured correctly. I recommend using unsalted butter so you can control the saltiness, and high-quality vanilla extract for that deep, aromatic flavor that defines a good sugar cookie.
Here is what you will need to gather:
- Unsalted Butter: 1 cup (2 sticks), softened to room temperature. This is crucial for creaming properly. If it is too cold, it won’t incorporate air; if it is too warm, the cookies will spread too much. I prefer brands like Kerrygold or Plugra for their rich flavor and consistent texture.
- Granulated Sugar: 1.5 cups. This provides the structure and the slight crunch on the edges. Do not substitute with brown sugar, as it will make the cookies chewy and dark.
- Eggs: 2 large eggs, room temperature. Cold eggs can cause the butter mixture to break. Let them sit on the counter for 30 minutes before starting.
- Vanilla Extract: 2 teaspoons. Use pure vanilla, not imitation. The flavor is concentrated and essential here. Nielsen-Massey is my go-to for its intensity.
- All-Purpose Flour: 3 to 3.5 cups. Sift this to remove lumps. Too much flour will make the cookies dry, so measure carefully. Spoon and level method is best.
- Baking Powder: 1 teaspoon. This gives the cookies a tiny lift, keeping them tender rather than dense.
- Salt: 1 teaspoon. Balances the sweetness and enhances the vanilla flavor.
- White Royal Icing: Prepared from powdered sugar, meringue powder (or egg whites), and water. Meringue powder is safer for raw consumption and holds color better.
- Black Gel Food Coloring: Gel coloring is essential. Liquid coloring will thin out the icing and change the consistency. A small dab goes a long way.
- Toothpicks: Standard wooden toothpicks for dragging the web pattern. Have a box ready.
For the icing, if you are allergic to egg whites, meringue powder is a great substitute. It is pasteurized and safe for raw consumption. If you want a natural alternative to black food coloring, you can use activated charcoal, but be aware it can have a slight earthy taste. For most people, gel coloring is the easiest and most vibrant option.
Equipment Needed
You do not need a fancy kitchen to make these cookies, but having the right tools makes the process smoother and the results more consistent.
- Stand Mixer or Hand Mixer: Essential for creaming the butter and sugar until light and fluffy. A stand mixer is easier, but a hand mixer works fine if you have the arm strength.
- Rolling Pin: A standard wooden or marble rolling pin. Marble keeps the dough cool, which is helpful if your kitchen is warm.
- Spiderweb Cookie Cutter: While you can use any round cutter (2-3 inches), a spiderweb-shaped cutter can add extra detail. However, a simple circle is classic and effective.
- Baking Sheets: Heavy-gauge aluminum sheets prevent burning. Line them with parchment paper or silicone baking mats for easy cleanup and even baking.
- Small Bowls: For separating the white icing and the black icing. Glass or ceramic bowls work best.
- Piping Bags or Ziploc Bags: For applying the icing. Snip the corner for a fine tip.
- Toothpicks: For creating the web design.
- Cooling Racks: To cool the cookies completely before icing. Icing on warm cookies will melt and slide off.
If you do not have a stand mixer, you can use a wooden spoon and some elbow grease, but it will take longer. For the icing, a small squeeze bottle can give you more control than a Ziploc bag if you are worried about steady hands. Budget-friendly option: Parchment paper is cheaper than silicone mats and works just as well for this recipe.
Preparation Method
Step 1: Prepare the Dough (30 minutes)
In the bowl of a stand mixer fitted with the paddle attachment, cream together the softened butter and granulated sugar on medium-high speed for about 3-4 minutes. The mixture should look pale and fluffy. This step incorporates air, which helps the cookies rise slightly. If using a hand mixer, this will take 5-6 minutes.
Add the eggs one at a time, beating well after each addition. Scrape down the sides of the bowl with a spatula to ensure everything is incorporated. Mix in the vanilla extract until combined.
In a separate bowl, whisk together the flour, baking powder, and salt. Gradually add the dry ingredients to the wet mixture on low speed. Mix until just combined. Do not overmix, or the cookies will become tough. The dough should be soft but not sticky. If it is too sticky, add 1 more tablespoon of flour. If it is too dry, add 1 teaspoon of milk.
Step 2: Chill the Dough (1-2 hours)
Divide the dough in half. Flatten each half into a disk and wrap tightly in plastic wrap. Chill in the refrigerator for at least 1 hour, or up to 2 days. Chilling is non-negotiable for spiderweb cookies because the dough needs to be firm enough to roll thinly without sticking and to hold its shape during baking.
Step 3: Bake the Cookies (15 minutes)
Preheat your oven to 350°F (175°C). Line two baking sheets with parchment paper. Remove one disk of dough from the fridge. On a lightly floured surface, roll the dough out to about 1/4 inch thickness. Use a round cookie cutter (2-3 inches) to cut out shapes. Place them on the baking sheets, leaving 1 inch between each cookie. Reroll the scraps and cut again.
Bake for 10-12 minutes, or until the edges are just starting to turn golden brown. The centers should still look soft. Do not overbake. Let the cookies cool on the baking sheet for 5 minutes, then transfer to a wire rack to cool completely. This is crucial; warm cookies will melt the icing.
Step 4: Prepare the Icing (15 minutes)
While the cookies cool, prepare the royal icing. In a medium bowl, whisk together the powdered sugar and meringue powder. Add water gradually, whisking until you reach a piping consistency. It should be thick enough to hold peaks but fluid enough to pipe. Divide the icing into two bowls. Leave one bowl white.
Add black gel food coloring to the second bowl. Mix until you have a deep, dark black. The icing should be slightly thicker than the white icing to hold the web lines sharply.
Step 5: Decorate the Spiderwebs (20 minutes)
Fill a piping bag (or Ziploc bag with the corner snipped) with the white icing. Pipe a thick dot of white icing in the center of each cooled cookie. Do not spread it out yet.
Take a toothpick and drag it from the center dot outward to the edge of the cookie, creating a spoke. Repeat this 8-10 times, rotating the cookie as you go, to create radial lines. Be gentle; you do not want to break the icing peak.
Now, take the black icing in a separate piping bag. Pipe a small dot of black icing on top of the white center dot. Using a fresh toothpick, start at the edge of the cookie and drag the toothpick inward toward the center, following the path of the white spokes. Then, drag the toothpick outward from the center to the edge, creating a zigzag pattern. Rotate the cookie and repeat this inward/outward motion around the entire cookie, creating the web effect. You can do this in one continuous motion or in sections. The key is to let the black icing blend slightly with the white, creating that spooky, translucent look.
Let the cookies sit for 1-2 hours to allow the icing to harden completely before handling or storing.
Cooking Tips & Techniques
One of the biggest mistakes people make with sugar cookies is overworking the dough. When you mix the flour into the butter, stop as soon as no dry streaks remain. Overmixing develops gluten, which leads to tough, chewy cookies instead of tender, crumbly ones. If your dough feels warm or sticky after mixing, give it an extra 15 minutes in the fridge. Cold dough is easier to handle and keeps its shape better.
Another common issue is the icing bleeding. If your web pattern looks muddy, your icing might be too thin. If the white icing is too runny, the black lines will spread uncontrollably. Add more powdered sugar to thicken it. Conversely, if the black icing is too thick, it will crack when you drag the toothpick. Add a drop of water to thin it slightly. The consistency should be like heavy cream or honey.
I once ruined a whole batch of cookies by using liquid food coloring instead of gel. The liquid added too much water to the icing, turning it into a soup that ran off the cookies. Always use gel paste for vibrant colors and stable consistency. Also, make sure your cookies are completely cool before icing. Even a slight warmth can melt the icing, causing the web design to collapse. Patience is key here.
For efficiency, prepare all the dough and bake all the cookies first. Let them cool completely. Then, set up your icing station and decorate all the cookies at once. This way, you are not waiting for cookies to bake while your icing sets. It is a batch-process approach that saves time and keeps the workflow smooth.
Variations & Adaptations
While the classic white and black spiderweb is iconic, there are many ways to adapt this recipe to suit different tastes or themes.
- Glittering Webs: Add edible silver or gold luster dust to the black icing. This creates a shimmering effect that looks like a web covered in morning dew. It is perfect for a more elegant, less spooky presentation.
- Colorful Webs: Instead of black, use purple, green, or orange gel coloring. This is great for kids’ parties or for a less intimidating look. Purple and white is particularly striking for Halloween.
- Chocolate Spiderwebs: Substitute half of the flour with cocoa powder for a chocolate sugar cookie base. Pipe white icing on the dark brown cookie for a high-contrast look. The chocolate flavor pairs beautifully with the sweet icing.
- Gluten-Free Option: Use a 1:1 gluten-free flour blend. Ensure the blend contains xanthan gum, or add 1/2 teaspoon to the dry ingredients. The texture may be slightly more crumbly, so handle with care.
- Vegan Adaptation: Use vegan butter sticks and flax eggs (1 tablespoon ground flaxseed mixed with 3 tablespoons water per egg). The dough may spread more, so chill it longer before baking.
I personally love adding a sprinkle of edible glitter to the white icing before the black web is added. It adds a subtle sparkle that catches the light. It is a small detail, but it makes the cookies feel extra special. Feel free to experiment with different colors and textures to make them your own.
Serving & Storage Suggestions
These cookies are best served at room temperature. Cold icing can be hard and waxy, while warm icing is soft and melts in your mouth. Store them in an airtight container at room temperature for up to 1 week. Place parchment paper between layers to prevent the icing from sticking together.
For longer storage, you can freeze the unbaked dough disks for up to 3 months. Thaw in the refrigerator overnight before rolling and baking. The baked cookies can also be frozen for up to 2 months, but the icing may lose some of its shine. It is best to decorate them fresh.
When serving, arrange the cookies on a platter with other Halloween treats like pumpkin-shaped cookies or candy corn. They pair well with cold milk or a warm cup of tea. The contrast between the sweet cookie and the bitter tea is delightful. If you are giving them as gifts, tie them with black or orange ribbon and add a small tag with the recipe name. They make a thoughtful and impressive homemade gift.
Flavors develop over time. The cookies taste best after 24 hours, as the flavors have had time to meld and the texture has stabilized. If you make them a day ahead, the quality will actually improve. Just keep them in a cool, dry place away from direct sunlight.
Nutritional Information & Benefits
These spiderweb sugar cookies are a treat, so they are higher in calories and sugar compared to savory snacks. One cookie contains approximately 120-150 calories, depending on size and icing thickness. They are made with all-purpose flour, so they are not gluten-free unless modified. They contain dairy (butter) and eggs, so they are not suitable for those with dairy or egg allergies.
However, they are a good source of quick energy, making them a fun snack for active kids or a sweet pick-me-up during a busy day. The vanilla extract provides antioxidants, though in small amounts. Moderation is key. Enjoy them as a special occasion treat rather than an everyday snack. If you are watching your sugar intake, consider making smaller cookies or using a lighter icing application.
From a wellness perspective, baking can be a stress-relieving activity. The rhythmic process of mixing and decorating can be meditative, helping to lower cortisol levels. So, while the cookies themselves are a indulgence, the act of making them can be a form of self-care. Balance is everything.
Conclusion
Making spiderweb sugar cookies is more than just baking; it is a creative outlet that brings a bit of magic to the kitchen. These cookies are easy to make, visually stunning, and delicious to eat. They are perfect for Halloween parties, school events, or just a fun weekend project with family. I love this recipe because it combines simplicity with sophistication, allowing anyone to create professional-looking treats with minimal effort.
I encourage you to try this recipe and make it your own. Experiment with different colors, add glitter, or change the shape of the cutter. Share your creations with friends and family, and don’t be afraid to ask questions if you run into any issues. I would love to hear how they turned out for you.
If you enjoyed this recipe, you might also like my Easy Halloween Pumpkin Pie Cookies for a seasonal twist, or my Witch Finger Cookies for a spooky sidekick. Leave a comment below with your thoughts and tips!
FAQs
Can I use store-bought sugar cookie dough?
Yes, you can use store-bought dough, but homemade dough yields a better texture and flavor. If using store-bought, ensure it is chilled before rolling to prevent spreading.
Why did my icing bleed?
This usually happens if the icing is too thin or if the cookies were not completely cool. Ensure your icing is thick and pipe a solid barrier of white icing before adding the black web.
How long does the icing take to dry?
It takes about 1-2 hours for royal icing to harden completely. You can speed this up by placing the cookies in a cool, dry area with good air circulation.
Can I freeze the decorated cookies?
It is not recommended to freeze decorated cookies as the icing may crack or lose its shine. Freeze the unbaked cookies instead.
What if I don’t have meringue powder?
You can use pasteurized egg whites from a carton, but be aware that royal icing made with fresh egg whites has a shorter shelf life and is not safe for raw consumption if not pasteurized. Meringue powder is the safest and most stable option.
Pin This Recipe!

Easy Halloween Spiderweb Sugar Cookies: Perfect 5-Min Treat
These spiderweb sugar cookies feature a tender, melt-in-your-mouth dough and a professional-looking royal icing design. They are make-ahead friendly, kid-friendly, and perfect for Halloween or any spooky-themed party.
- Prep Time: 30 minutes
- Cook Time: 15 minutes
- Total Time: 45 minutes
- Yield: Approximately 24 cookies 1x
- Category: Dessert
- Cuisine: American
Ingredients
- 1 cup (2 sticks) unsalted butter, softened to room temperature
- 1.5 cups granulated sugar
- 2 large eggs, room temperature
- 2 teaspoons pure vanilla extract
- 3 to 3.5 cups all-purpose flour, sifted
- 1 teaspoon baking powder
- 1 teaspoon salt
- White Royal Icing (prepared from powdered sugar, meringue powder, and water)
- Black gel food coloring
- Standard wooden toothpicks
Instructions
- In a stand mixer fitted with the paddle attachment, cream together the softened butter and granulated sugar on medium-high speed for 3-4 minutes until pale and fluffy.
- Add the eggs one at a time, beating well after each addition. Scrape down the sides of the bowl and mix in the vanilla extract.
- In a separate bowl, whisk together the flour, baking powder, and salt. Gradually add the dry ingredients to the wet mixture on low speed until just combined. Do not overmix.
- Divide the dough in half, flatten into disks, wrap tightly in plastic wrap, and chill in the refrigerator for at least 1 hour (or up to 2 days).
- Preheat oven to 350°F (175°C). Line baking sheets with parchment paper.
- Roll the chilled dough out to about 1/4 inch thickness on a lightly floured surface. Cut out shapes using a 2-3 inch round cookie cutter.
- Place cookies on baking sheets, leaving 1 inch between each. Bake for 10-12 minutes until edges are just starting to turn golden brown.
- Let cookies cool on the baking sheet for 5 minutes, then transfer to a wire rack to cool completely.
- While cookies cool, prepare royal icing by whisking powdered sugar and meringue powder with water until it reaches a piping consistency.
- Divide icing into two bowls. Leave one white. Add black gel food coloring to the second bowl and mix until deep black.
- Pipe a thick dot of white icing in the center of each cooled cookie.
- Using a toothpick, drag from the center dot outward to the edge to create radial spokes (8-10 times).
- Pipe a small dot of black icing on top of the white center. Using a fresh toothpick, drag from the edge inward to the center, then outward again, creating a zigzag web pattern. Rotate and repeat around the cookie.
- Let cookies sit for 1-2 hours to allow the icing to harden completely before handling or storing.
Notes
Ensure cookies are completely cool before icing to prevent melting. Use gel food coloring, not liquid, to maintain icing consistency. For gluten-free options, use a 1:1 gluten-free flour blend. For vegan options, use vegan butter and flax eggs.
Nutrition
- Serving Size: 1 cookie
- Calories: 135
- Sugar: 12
- Sodium: 120
- Fat: 6
- Saturated Fat: 4
- Carbohydrates: 18
- Fiber: 0.5
- Protein: 2
Keywords: Halloween cookies, spiderweb sugar cookies, royal icing, easy baking, holiday treats, kid-friendly recipes



