Love this? Save it for later!
Share the inspiration with your friends
I was standing in the checkout line at the grocery store last October, staring blankly at the display of Halloween-themed cookies near the register, when the smell hit me. Not from the store, but from somewhere deep in my memory—that specific, almost-too-sweet scent of royal icing and vanilla. And just like that, I was eight years old again, sitting at my Aunt Maggie’s kitchen table, my tongue poking out in concentration as I tried to pipe a web onto a sugar cookie. She’d passed away two years ago, and I hadn’t made these cookies since that Halloween.
The package in my hand suddenly felt wrong. Too perfect. Too uniform. Where was the slightly crooked spiderweb? Where was the tiny fingerprint dented into the icing because I’d pressed too hard? I put the package back and walked out of the store with nothing but a mission: I was going to recreate those cookies, even if it meant messing up a dozen batches first.
Honestly, the first attempt was a disaster. I used the wrong icing consistency, my spiderwebs looked more like sad puddles, and I may have thrown a spatula across the kitchen. But by batch three, something clicked. The web started to form properly—thin, delicate strands of dark icing spreading across the white base like a real spider’s work. I mean, maybe you’ve been there, chasing a taste from childhood only to realize you’ve forgotten exactly how it felt. That’s what these spiderweb cookies are for me now. They’re not just cookies. They’re a way to sit at that table one more time.
Why You’ll Love This Recipe
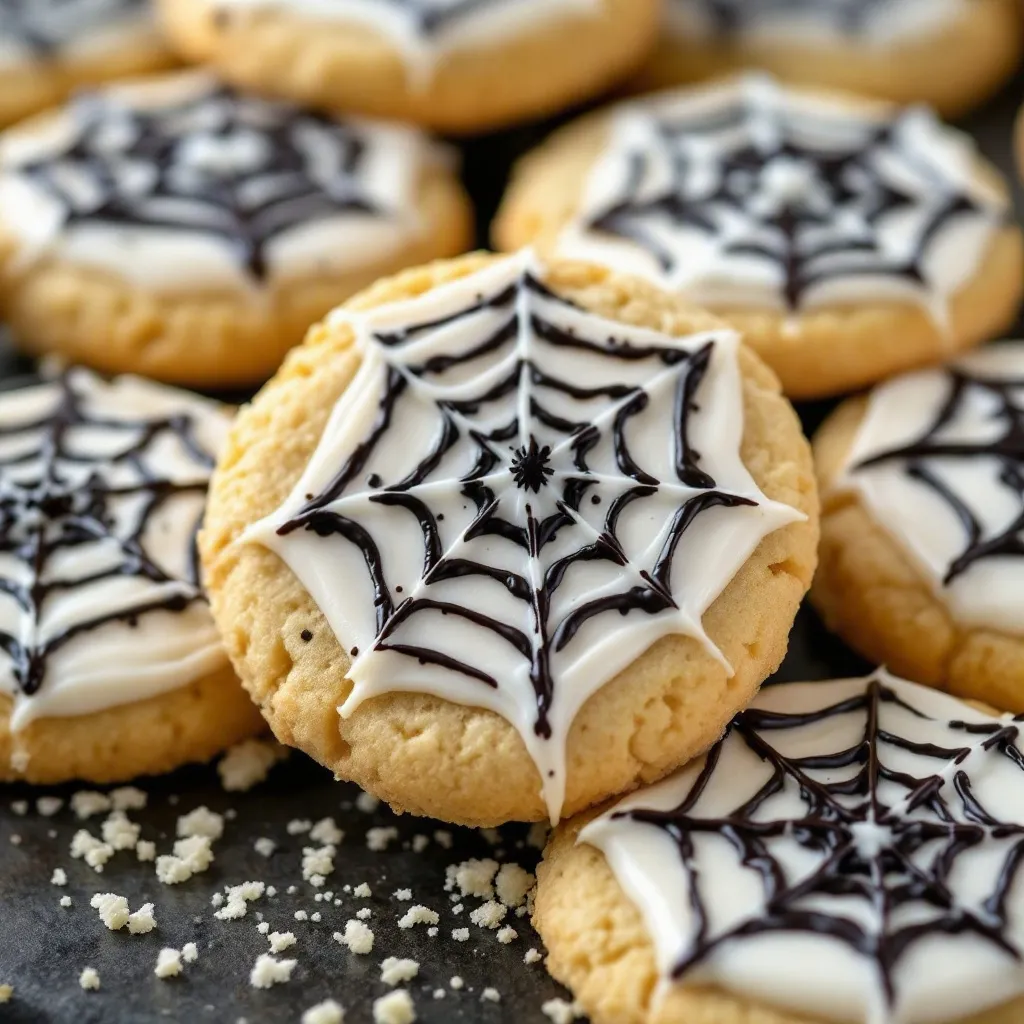
These spiderweb cookies are the kind of Halloween treat that stops people mid-conversation. They look like you spent hours in a professional bakery, but the secret is in the technique—not the time. Let me tell you why this recipe works so well.
- Stunning Without Stress : The spiderweb design looks intricate, but you’ll nail it with one simple piping trick. No artistic talent required.
- Buttery, Not Crumbly : This dough holds its shape perfectly during baking, so your cookie edges stay crisp and clean for decorating.
- Perfect Icing Every Time : I’ve tested the royal icing ratio about seven times to get that smooth, glossy finish that doesn’t crack or slide off.
- Make-Ahead Friendly : The dough freezes beautifully, and decorated cookies stay fresh for up to a week. Perfect for Halloween party prep.
- Crowd-Pleasing Flavor : That classic vanilla-forward sugar cookie base with a hint of almond—everyone asks for the recipe.
What makes these different from every other spiderweb cookie out there? It’s the icing consistency. Most recipes tell you to use a thick icing, but I found that a slightly thinner base layer with a thicker web layer creates that dramatic 3D effect. The web actually sits on top of the white icing instead of sinking in. I tested this with three different icing consistencies before I got it right—so you don’t have to.
These cookies are the kind that make you close your eyes after the first bite. The butter, the vanilla, the slight almond warmth—it’s comfort food disguised as a spooky Halloween treat. Perfect for impressing at a party, or just making a Tuesday in October feel a little more magical.
What Ingredients You Will Need
This recipe uses simple, pantry-friendly ingredients to create a cookie that tastes like it came from a fancy bakery. The magic is in how they work together.
For the Sugar Cookie Base
- Unsalted butter, softened to room temperature (1 cup / 226g) — I recommend using a high-fat European-style butter like Kerrygold for the richest flavor and best spread control
- Granulated sugar (1 cup / 200g) — standard white sugar works perfectly; no need for superfine
- Large egg, room temperature (1) — this helps the dough come together without being too sticky
- Pure vanilla extract (2 teaspoons) — skip the imitation stuff here; the flavor really shines through
- Almond extract (½ teaspoon) — this is my secret ingredient; it adds a subtle warmth that makes people ask “what’s in these?”
- All-purpose flour (2 ½ cups / 312g) — spoon and level it; don’t scoop directly from the bag or you’ll end up with dry dough
- Baking powder (1 teaspoon) — ensures the cookies puff slightly without spreading too much
- Salt (½ teaspoon) — fine sea salt or table salt balances the sweetness
For the Royal Icing
- Powdered sugar (3 cups / 360g) — sifted to remove lumps; trust me on this
- Meringue powder (2 tablespoons) — this stabilizes the icing and gives it that smooth, professional finish (I use Wilton brand)
- Warm water (4-5 tablespoons) — add slowly; you might need slightly more or less depending on humidity
- Vanilla extract (½ teaspoon) — optional but adds a nice background flavor
- Black gel food coloring — regular liquid coloring will thin out your icing too much; gel is non-negotiable here
If you’re looking for a dairy-free option, you can swap the butter for a high-quality vegan butter stick (not the spreadable kind in a tub). The texture will be slightly less tender, but the flavor is still excellent. For a gluten-free version, use a 1:1 gluten-free baking flour blend that contains xanthan gum—I’ve tested this with Bob’s Red Mill and it worked beautifully.
Equipment Needed
- Stand mixer or hand mixer — either works; I’ve made these with both and the hand mixer actually gives me more control over the creaming process
- Large mixing bowls — at least two: one for the dough, one for the icing
- Rolling pin — if you don’t have one, a wine bottle works in a pinch (I’ve done it)
- Round cookie cutter (2.5 to 3 inches) — a drinking glass works if you’re improvising
- Baking sheets (2) — lined with parchment paper or silicone baking mats
- Piping bags (3-4) — disposable ones are easiest; you’ll need one for the white base and one for the black web
- Small round piping tips (#2 or #3) — this is crucial for the thin web lines; a #4 tip will make blobby webs
- Toothpicks — for dragging the web lines into that perfect pattern
- Cooling rack — completely flat cookies are easier to decorate; wire racks prevent soggy bottoms
If you’re new to piping, don’t stress. I’ve ruined plenty of cookies with shaky hands. The key is to practice on a piece of parchment paper first—just pipe a few lines and drag them with a toothpick until you get the feel for it. Also, keep a damp paper towel nearby to wipe the piping tip if it gets clogged.
Preparation Method
- Cream the butter and sugar (5-7 minutes). In your mixing bowl, beat the softened butter and granulated sugar together on medium-high speed until the mixture is pale, fluffy, and almost doubled in volume. Scrape the bowl down at least once. This step is non-negotiable—proper creaming is what gives these cookies their tender texture.
- Add the wet ingredients. Beat in the egg, vanilla extract, and almond extract on medium speed until fully combined. The mixture might look slightly curdled at this point—that’s normal, don’t panic.
- Whisk the dry ingredients separately. In a medium bowl, whisk together the flour, baking powder, and salt. This ensures the baking powder is evenly distributed so your cookies rise uniformly.
- Combine wet and dry. Gradually add the dry mixture to the wet mixture on low speed, mixing just until the dough comes together. Stop as soon as no streaks of flour remain. Overmixing here will make tough cookies.
- Chill the dough (at least 1 hour). Divide the dough in half, flatten each into a disc, wrap tightly in plastic wrap, and refrigerate. This step is not optional—chilled dough spreads less and holds its shape better during baking. I usually chill mine overnight.
- Preheat and prepare. Preheat your oven to 350°F (175°C). Line two baking sheets with parchment paper or silicone mats.
- Roll and cut. On a lightly floured surface, roll one disc of dough to ¼-inch thickness. Cut out rounds using your cookie cutter and place them 2 inches apart on the prepared baking sheets. Re-roll scraps once—after that, the dough gets tough.
- Bake (8-10 minutes). Bake until the edges are just barely golden. The centers should look set but not brown. Let the cookies cool on the baking sheet for 5 minutes, then transfer to a wire rack to cool completely. Do not decorate warm cookies—the icing will melt and slide right off.
- Make the royal icing. In a large bowl, combine the powdered sugar and meringue powder. Add 4 tablespoons of warm water and the vanilla extract. Beat on low speed until combined, then increase to medium-high and beat for 4-5 minutes until the icing is glossy and holds stiff peaks. If it’s too thick, add water ½ teaspoon at a time. If it’s too thin, add more powdered sugar.
- Divide and color the icing. Transfer about ⅔ of the icing to a separate bowl. Leave this white—this is your base layer. To the remaining ⅓, add black gel food coloring until you reach a deep, dark black. Transfer each color to separate piping bags fitted with #2 tips.
- Pipe the base layer. Outline each cookie with the white icing, then fill in the center using a back-and-forth motion. Use a toothpick to pop any air bubbles and spread the icing evenly to the edges. Let the base layer dry for at least 2 hours—it needs to be completely set before you pipe the web.
- Pipe the spiderweb. Once the base is dry, use the black icing to pipe 3-4 concentric circles on each cookie, starting from the center and working outward. Then, use a toothpick to drag from the center outward through all the circles, creating the web effect. Wipe the toothpick clean after each drag.
- Let the icing set completely (4-6 hours or overnight). The cookies are ready when the icing is firm to the touch and no longer shiny.
Sensory cue: When you drag the toothpick through the black circles, you should feel slight resistance—that’s the web forming. If the black icing sinks into the white base, your base layer wasn’t dry enough. If the black icing breaks or crumbles, it’s too thick.
Cooking Tips & Techniques
Let me save you from the mistakes I made. The first time I attempted these, I used liquid food coloring and my black icing turned into a runny mess that bled into the white base. It looked like a crime scene, not a spiderweb. Use gel coloring—it’s concentrated and won’t mess with your consistency.
Another thing I learned the hard way: humidity is the enemy of royal icing. If you’re decorating on a rainy day, expect longer drying times. I’ve had cookies take nearly 8 hours to set in humid weather. Plan accordingly, or run a dehumidifier in the room.
For the cleanest spiderwebs, make sure your toothpick is sharp. A dull toothpick will pull the icing rather than drag it, creating messy edges. I keep a stack of fresh toothpicks nearby and swap them out after every 3-4 cookies.
If you’re making these with kids (bless your patience), let them pipe the base layer and do the toothpick drags. The concentric circles require a steadier hand—I usually do those myself. It’s a good division of labor that keeps everyone involved without frustration.
One more thing: don’t skip the almond extract. I know it’s a small amount, but it’s what makes these cookies taste nostalgic and special. Without it, they’re just sugar cookies with fancy icing. With it, they’re the cookies people request year after year.
Variations & Adaptations
- Chocolate Spiderweb Cookies : Replace ¼ cup of the all-purpose flour with unsweetened cocoa powder. Reduce the vanilla to 1 teaspoon and add ½ teaspoon of espresso powder to deepen the chocolate flavor. The white icing looks stunning against dark cookies.
- Vegan Spiderweb Cookies : Use vegan butter sticks, a flax egg (1 tablespoon ground flaxseed + 3 tablespoons water, let sit for 5 minutes), and replace the meringue powder with 2 tablespoons of aquafaba (chickpea liquid) whipped to stiff peaks. The texture is slightly softer but still delicious.
- Spiced Halloween Variation : Add 1 teaspoon of pumpkin pie spice and ¼ teaspoon of cinnamon to the dry ingredients. This version pairs beautifully with a cinnamon-vanilla icing. I made these for a Halloween brunch and they disappeared in minutes.
- Gluten-Free Adaptation : Use a 1:1 gluten-free baking flour blend that contains xanthan gum. Add an extra tablespoon of milk or water to the dough since gluten-free flours absorb more moisture. The cookies will be slightly more delicate, so handle them gently.
- Colored Web Option : Instead of black, use purple, orange, or neon green gel food coloring for the web. This is great if you’re making these for a non-Halloween event or if black icing feels too intense for younger kids.
Serving & Storage Suggestions
These cookies are best served at room temperature. The icing should be completely set and firm to the touch—if it’s still tacky, give it more time. I like to arrange them on a platter with some fake spiderwebs draped around for that extra spooky touch. They make a fantastic centerpiece for a Halloween party table.
For storage, place the fully decorated cookies in a single layer in an airtight container, separated by parchment paper. They’ll stay fresh at room temperature for up to 7 days. Do not refrigerate them—the humidity in the fridge can cause the icing to become sticky and the cookies to soften.
You can freeze the undecorated baked cookies for up to 3 months. Just wrap them tightly in plastic wrap and place in a freezer-safe bag. When you’re ready to decorate, thaw them at room temperature for about 30 minutes, then proceed with the icing. I actually prefer freezing the dough discs instead—they thaw overnight in the fridge and bake up fresh.
The flavors actually develop and meld together after a day or two. I’ve found that day-old decorated cookies taste even better than fresh ones. The icing sets completely and the cookie softens just slightly—it’s perfection.
Nutritional Information & Benefits
Per cookie (based on a 2.5-inch round, yields approximately 24 cookies):
- Calories: 185
- Fat: 8g
- Carbohydrates: 27g
- Protein: 2g
- Sugar: 18g
These are, let’s be honest, a treat. But there are a few silver linings. The butter provides a small amount of vitamin A, and the egg contributes protein and choline. If you use the almond extract variation, you’re getting a tiny antioxidant boost from the almonds. Mostly, though, these cookies are about joy and tradition—and there’s nutritional value in that, too.
For those with dietary restrictions, the vegan and gluten-free variations work beautifully. The meringue powder in the royal icing is egg-free, which makes the icing itself suitable for those avoiding eggs. Just be aware that the cookies themselves contain egg unless you use the flax egg substitute.
As always, enjoy these in moderation. I find that one cookie satisfies my sweet tooth completely—any more and the sugar rush gets a bit intense. Pair them with a glass of cold milk or a hot cup of coffee for the perfect balance.
Conclusion
These spiderweb cookies are more than just a Halloween treat—they’re a way to slow down, get a little flour on your counter, and create something that feels special. Whether you’re making them for a party, a classroom, or just to eat while watching a scary movie, they deliver on every level. The buttery cookie, the smooth icing, the dramatic web design—it all comes together in a way that feels both impressive and deeply comforting.
I’d love to hear how yours turn out. Did you try a different color? Add a little spider ring on top? Mess up the first batch like I did? Drop a comment below and share your spiderweb cookie story. And if you’re looking for more Halloween baking inspiration, don’t miss our Halloween sugar cookies or these pumpkin spice cookies that are perfect for the season.
Happy Halloween, and happy baking. May your webs be crisp, your icing be glossy, and your kitchen smell like vanilla and magic.
Frequently Asked Questions
Can I make these cookies ahead of time?
Absolutely. You can make the dough up to 3 days in advance and keep it refrigerated. You can also bake the cookies up to a week ahead and store them undecorated in an airtight container. Decorate them the day before you plan to serve them for the freshest look.
Why did my spiderweb icing sink into the white base?
This happens when the white base layer isn’t fully dry. Royal icing needs at least 2 hours to set before you pipe the web on top. If you’re in a humid environment, it may take longer. Test by lightly touching the center of a test cookie—if it’s still tacky, wait longer.
Can I use liquid food coloring instead of gel?
I strongly recommend against it. Liquid food coloring adds too much moisture to the royal icing, which changes the consistency and can cause the black icing to bleed into the white base. Gel food coloring is concentrated and won’t affect the texture.
How do I get perfectly round cookies without a cookie cutter?
Use the rim of a drinking glass or a small bowl. Dip the rim in flour before cutting to prevent sticking. You can also use a biscuit cutter if you have one. The key is to press straight down without twisting—twisting seals the edges and prevents the cookies from spreading evenly.
Can I freeze the decorated cookies?
I don’t recommend it. Royal icing can become sticky and lose its shine when thawed from frozen. If you need to make these well in advance, freeze the undecorated baked cookies and decorate them after thawing. The icing will look much better.
Pin This Recipe!

Best Spiderweb Cookies Recipe – Perfect Iced Halloween Treats

These spiderweb cookies are the kind of Halloween treat that stops people mid-conversation. They look like you spent hours in a professional bakery, but the secret is in the technique—not the time.
- Prep Time: 15 minutes
- Cook Time: 10 minutes
- Total Time: 45 minutes (plus chilling and drying time)
- Yield: 24 servings 1x
- Category: Dessert
- Cuisine: American
Ingredients
- 1 cup (226g) unsalted butter, softened to room temperature
- 1 cup (200g) granulated sugar
- 1 large egg, room temperature
- 2 teaspoons pure vanilla extract
- ½ teaspoon almond extract
- 2 ½ cups (312g) all-purpose flour, spooned and leveled
- 1 teaspoon baking powder
- ½ teaspoon fine sea salt or table salt
- 3 cups (360g) powdered sugar, sifted
- 2 tablespoons meringue powder
- 4–5 tablespoons warm water
- ½ teaspoon vanilla extract (optional)
- Black gel food coloring
Instructions
- Cream the butter and sugar (5-7 minutes). In your mixing bowl, beat the softened butter and granulated sugar together on medium-high speed until the mixture is pale, fluffy, and almost doubled in volume. Scrape the bowl down at least once.
- Add the wet ingredients. Beat in the egg, vanilla extract, and almond extract on medium speed until fully combined. The mixture might look slightly curdled at this point—that’s normal.
- Whisk the dry ingredients separately. In a medium bowl, whisk together the flour, baking powder, and salt.
- Combine wet and dry. Gradually add the dry mixture to the wet mixture on low speed, mixing just until the dough comes together. Stop as soon as no streaks of flour remain.
- Chill the dough (at least 1 hour). Divide the dough in half, flatten each into a disc, wrap tightly in plastic wrap, and refrigerate.
- Preheat and prepare. Preheat your oven to 350°F (175°C). Line two baking sheets with parchment paper or silicone mats.
- Roll and cut. On a lightly floured surface, roll one disc of dough to ¼-inch thickness. Cut out rounds using your cookie cutter and place them 2 inches apart on the prepared baking sheets. Re-roll scraps once.
- Bake (8-10 minutes). Bake until the edges are just barely golden. Let the cookies cool on the baking sheet for 5 minutes, then transfer to a wire rack to cool completely.
- Make the royal icing. In a large bowl, combine the powdered sugar and meringue powder. Add 4 tablespoons of warm water and the vanilla extract. Beat on low speed until combined, then increase to medium-high and beat for 4-5 minutes until the icing is glossy and holds stiff peaks. If too thick, add water ½ teaspoon at a time. If too thin, add more powdered sugar.
- Divide and color the icing. Transfer about ⅔ of the icing to a separate bowl. Leave this white. To the remaining ⅓, add black gel food coloring until deep black. Transfer each color to separate piping bags fitted with #2 tips.
- Pipe the base layer. Outline each cookie with the white icing, then fill in the center using a back-and-forth motion. Use a toothpick to pop any air bubbles and spread the icing evenly to the edges. Let the base layer dry for at least 2 hours.
- Pipe the spiderweb. Once the base is dry, use the black icing to pipe 3-4 concentric circles on each cookie, starting from the center and working outward. Then, use a toothpick to drag from the center outward through all the circles, creating the web effect. Wipe the toothpick clean after each drag.
- Let the icing set completely (4-6 hours or overnight). The cookies are ready when the icing is firm to the touch and no longer shiny.
Notes
Use gel food coloring, not liquid, to avoid runny icing. Humidity affects drying time; on humid days, icing may take up to 8 hours to set. Practice piping on parchment paper first. Don’t skip the almond extract—it adds a nostalgic flavor. For cleanest webs, use a sharp toothpick and swap after every 3-4 cookies.
Nutrition
- Serving Size: 1 cookie
- Calories: 185
- Sugar: 18
- Sodium: 95
- Fat: 8
- Saturated Fat: 5
- Carbohydrates: 27
- Protein: 2
Keywords: spiderweb cookies, Halloween cookies, sugar cookies, royal icing, Halloween treats, decorated cookies



