Love this? Save it for later!
Share the inspiration with your friends
My niece, Lily, showed up at my door last October, two hours before her school’s Halloween party, holding a bag of sugar cookies from the grocery store and looking like she’d just lost a fight with a ghost. “They’re so boring, Auntie,” she said, holding up the sad, plain rounds. I looked in my pantry—powdered sugar, yes. Cocoa powder, thankfully. A squeeze bottle I’d bought for a football charcuterie board that never got used. I told her to grab a spoon, and we figured it out right there on the counter. Twenty minutes later, she was walking out the door with a plate of Spooky Spiderweb Sugar Cookies that made the other moms ask for the recipe. That’s the thing about these cookies—they look like you spent hours, but honestly, they’re just a happy accident waiting to happen.
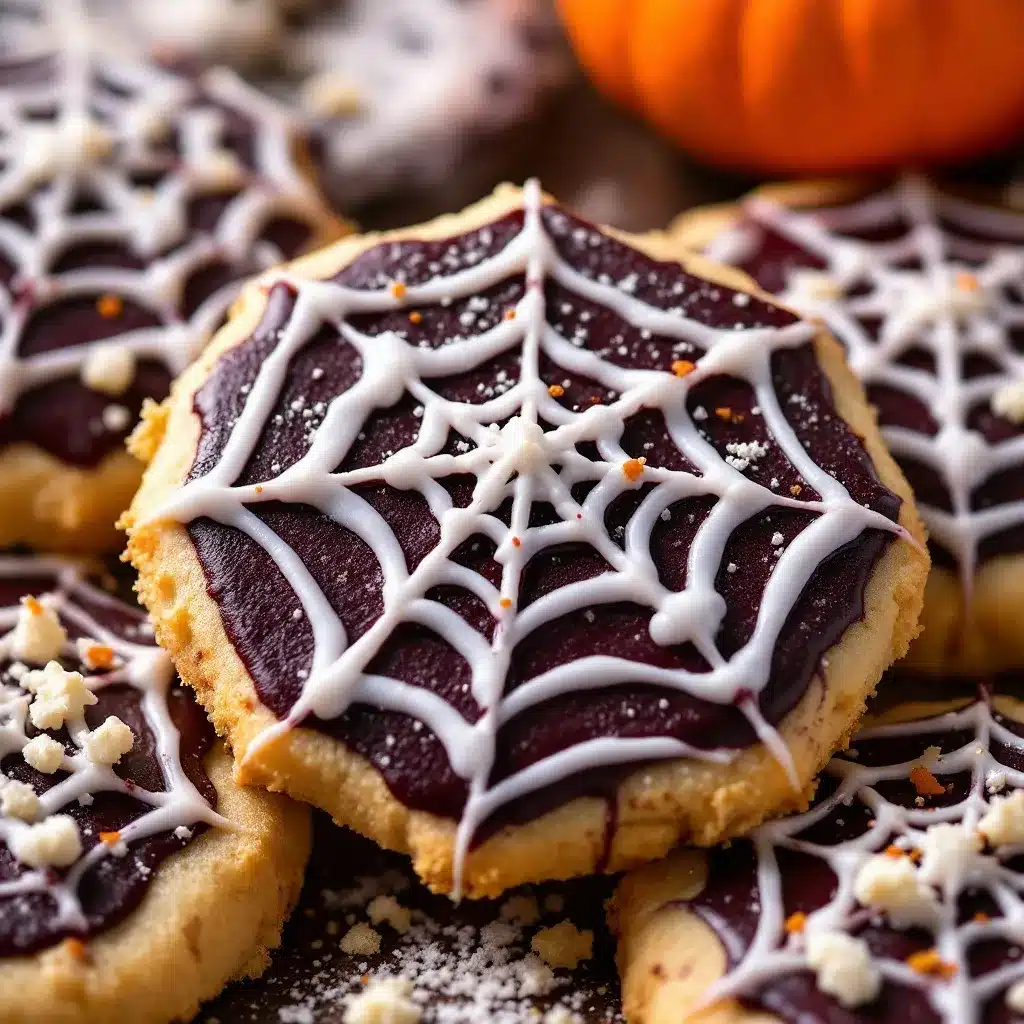
The magic is in the icing. You take a simple powdered sugar glaze (the kind you could make in your sleep), split it, and turn half into a dark, inky spiderweb base. Then you pipe on concentric circles of the white glaze and drag a toothpick through them like you’re casting a little spell. It’s almost too easy. The cookies themselves are soft, buttery, and sturdy enough to hold the design without cracking—which is crucial when you’ve got a hyper kid waiting to decorate. I’ve tested this with three different butter temperatures, two types of sugar, and one very sticky disaster involving a broken piping bag. This version? It works every time. These are the cookies that make you look like a Halloween hero, even if you started with a store-bought bag and a prayer.
Why You’ll Love This Recipe
These Spooky Spiderweb Sugar Cookies aren’t just another Halloween dessert. They’re the kind of treat that makes people stop and stare, then ask how you did it. And the best part? You don’t need to be a pastry chef to pull them off.
- Quick & Easy: From mixing to decorating in under 45 minutes. The icing sets fast, so you can serve them almost immediately.
- Simple Ingredients: Butter, sugar, flour, eggs, and a little cocoa. You probably have everything already.
- Perfect for Halloween Parties: These are the star of any school event, office potluck, or spooky movie night.
- Crowd-Pleaser: Kids go wild for the design, and adults love that they’re not overly sweet.
- Unbelievably Delicious: The combination of a tender sugar cookie with a glossy, crackly icing is next-level comfort food.
What makes these different from every other spiderweb cookie out there? It’s the texture. I spent three batches getting the cookie just right—soft in the middle, with a slight chew at the edges, so the icing doesn’t make them soggy. And the icing itself? It’s a two-tone glaze that dries to a beautiful, matte finish with a subtle sheen. No royal icing, no piping skills required. Just a toothpick and a steady hand. This is the cookie that makes you feel like a kitchen witch without the stress. It’s comfort food reimagined for Halloween—spooky, fun, and deeply satisfying.
What Ingredients You Will Need
This recipe uses simple, wholesome ingredients to deliver bold flavor and a perfect texture. Most of these are pantry staples, which is exactly what you want when a Halloween craving hits at 8 PM.
For the Sugar Cookies
- Unsalted butter, softened (1 cup / 226g) – I prefer Kerrygold for its rich flavor, but any good unsalted butter works. Let it sit out for 30 minutes, not an hour. Too soft, and the cookies spread too thin.
- Granulated sugar (1 cup / 200g) – Standard white sugar. No need for fancy stuff here.
- Large egg (1, room temperature) – Crack it into a cup first to avoid shell bits. Trust me on this one.
- Vanilla extract (1 teaspoon) – Pure vanilla, not imitation. It makes a difference in the final flavor.
- All-purpose flour (2 cups / 250g) – Spoon and level it. Don’t scoop straight from the bag, or you’ll end up with dry cookies.
- Baking powder (1/2 teaspoon) – Helps them puff just slightly without spreading too much.
- Salt (1/4 teaspoon) – Balances the sweetness. I use fine sea salt.
For the Spiderweb Icing
- Powdered sugar (2 cups / 240g) – Sifted if it’s lumpy. Nobody wants lumpy icing.
- Milk (3-4 tablespoons, whole milk preferred) – Adds richness. You can use 2% or even oat milk in a pinch.
- Vanilla extract (1/2 teaspoon) – For that warm, cozy flavor.
- Unsweetened cocoa powder (2 tablespoons) – I like Hershey’s Special Dark for a deeper color, but regular works fine.
- Water (1-2 teaspoons, to thin the dark icing) – Go slow. Add a drop at a time until it flows like thick paint.
For the dark icing, I’ve found that using cocoa powder instead of food coloring gives a more natural, spooky look. It’s less likely to stain little fingers, too. If you want an even darker web, add a tiny drop of black gel food coloring to the cocoa mixture. Just a tiny drop—it’s potent.
Equipment Needed
You don’t need a fancy bakery setup for these. Here’s what I use:
- Mixing bowls (one medium, one small) – Glass or stainless steel works best. Plastic can hold onto grease.
- Electric hand mixer or stand mixer – You can cream the butter by hand, but your arm will thank you for the mixer.
- Baking sheets (2) – Light-colored, non-stick sheets give the most even browning.
- Parchment paper or silicone baking mats – Parchment is my go-to. It’s cheap and makes cleanup a breeze.
- Round cookie cutter (2.5-inch / 6 cm) – A drinking glass works if you don’t have a cutter. Just press firmly.
- Cooling rack – Essential for letting the cookies cool completely before icing.
- Squeeze bottle or piping bag – A squeeze bottle with a small tip is easiest. No piping bag? Use a zip-top bag with the corner snipped off.
- Toothpicks – The secret weapon for creating the web design. Keep a few extras handy.
- Spatula – For transferring cookies without breaking them.
I’ve made these with a $2 squeeze bottle from the craft store, and they turned out just as good as with a fancy piping kit. Don’t overthink the equipment. Use what you have.
Preparation Method
Let’s get into the nitty-gritty. Follow these steps, and you’ll have a batch of Spooky Spiderweb Sugar Cookies that would make any ghost proud.
- Preheat your oven to 350°F (175°C). Line two baking sheets with parchment paper. This is non-negotiable—parchment prevents sticking and ensures even baking.
- Cream the butter and sugar. In a medium bowl, beat the softened butter and granulated sugar together until light and fluffy, about 2-3 minutes. You’re looking for a pale, creamy mixture that smells like heaven. Scrape down the sides once.
- Add the egg and vanilla. Beat in the egg and vanilla extract until fully combined. The mixture might look slightly curdled—that’s okay. It’ll come together when you add the flour.
- Mix the dry ingredients. In a separate small bowl, whisk together the flour, baking powder, and salt. This ensures the baking powder is evenly distributed. Nobody wants a cookie with a bitter baking powder pocket.
- Combine wet and dry. Gradually add the flour mixture to the butter mixture, mixing on low speed until just combined. Stop as soon as you don’t see any more white streaks. Overmixing makes tough cookies.
- Chill the dough (optional but recommended). Wrap the dough in plastic wrap and refrigerate for 15 minutes. This makes it easier to roll and cut. If you’re short on time, skip it—the cookies will just spread a tiny bit more.
- Roll and cut. On a lightly floured surface, roll the dough to about 1/4-inch (6 mm) thickness. Use your round cookie cutter to cut out circles. Re-roll the scraps once. Twice, and the cookies get tough.
- Bake. Place the cookies about 2 inches apart on the prepared baking sheets. Bake for 8-10 minutes, until the edges are just barely golden. The centers should look set but not brown. Let them cool on the baking sheet for 5 minutes, then transfer to a cooling rack.
- Make the white icing. In a small bowl, whisk together the powdered sugar, 3 tablespoons of milk, and vanilla extract. It should be thick but pourable—like heavy cream. Add the extra tablespoon of milk if needed.
- Make the dark icing. In another small bowl, whisk together 1/4 cup of the white icing with the cocoa powder. Add water, one teaspoon at a time, until it reaches the same consistency as the white icing. It should flow smoothly off a spoon.
- Ice the cookies. Once the cookies are completely cool, spread a thin, even layer of the white icing over each one. Let it set for 5 minutes—it should be tacky but not wet.
- Create the spiderweb. Fill your squeeze bottle or piping bag with the dark icing. Pipe a small dot in the center of each cookie. Then pipe 3-4 concentric circles around the dot, spacing them about 1/4 inch apart. Working quickly, drag a toothpick from the center dot outward through all the circles. Repeat this 4-5 times around the cookie, spacing the drags evenly. You’ll see the web pattern appear instantly.
- Let the icing set. Allow the cookies to sit at room temperature for 20-30 minutes until the icing is firm to the touch. Then serve or store.
A quick note: if the dark icing thickens while you’re working, add a drop of water and stir. If it’s too thin, add a pinch more powdered sugar. I’ve had to adjust mid-batch more times than I can count.
Cooking Tips & Techniques
I’ve made these Spooky Spiderweb Sugar Cookies at least a dozen times, and I’ve learned some things the hard way. Here’s what I wish someone had told me:
Don’t overbake the cookies. The first time I made these, I left them in for 12 minutes because I wanted them “crispy.” Big mistake. They were too hard to ice without cracking. Pull them out at the 8-minute mark when the edges are just set. They’ll continue baking on the hot sheet.
Chill the dough if you’re in a humid kitchen. I made a batch on a rainy October afternoon, and the dough was a sticky mess. A quick 20-minute chill in the fridge saved it. If your kitchen is warm, don’t skip this step.
Use a toothpick, not a knife. I tried using a butter knife to create the web pattern once. It was a disaster—the lines were too thick and the pattern disappeared. A toothpick gives you those delicate, spidery lines that make the design pop.
Work in batches. Don’t try to ice all the cookies at once. Ice 3-4 cookies, create the webs, then move on. The icing sets quickly, and you want the dark icing to drag through wet white icing.
Keep a damp paper towel nearby. If the dark icing gets crusty on the tip of your squeeze bottle, wipe it off with a damp towel. A clogged tip will ruin your flow.
Practice on a piece of parchment first. Before you touch a cookie, pipe a few practice webs on parchment paper. It helps you get the feel of the squeeze bottle and the toothpick drag. Plus, you can scrape it off and reuse the icing.
Variations & Adaptations
These cookies are incredibly versatile. Here are a few ways to switch them up:
- Gluten-Free Version: Swap the all-purpose flour for a 1:1 gluten-free baking flour. I’ve used Cup4Cup with great results. The cookies might be slightly more delicate, so handle them gently.
- Vegan Adaptation: Use vegan butter (like Earth Balance) and a flax egg (1 tablespoon ground flaxseed mixed with 3 tablespoons water). The texture will be a bit softer, but the flavor is still spot-on.
- Spiderweb Cupcakes: Use this same icing technique on top of black velvet cupcakes for a dramatic Halloween dessert. The dark cupcake base makes the white web really stand out.
- Chocolate Base: Add 2 tablespoons of cocoa powder to the cookie dough for a chocolate spiderweb cookie. It’s a double-chocolate dream.
- Spooky Spider Variation: After creating the web, place a small candy spider (or a chocolate-covered raisin with pretzel legs) on top. My niece loved this addition.
- Color Swap: Use purple or orange gel food coloring in the dark icing instead of cocoa for a brighter, more playful look. Great for a non-scary Halloween party.
I once tried a lavender-infused version for a witch-themed bridal shower. I steeped dried lavender in the milk for the icing. It was subtle, floral, and absolutely beautiful. Not traditional, but sometimes you need to break the rules.
Serving & Storage Suggestions
These cookies are best served at room temperature. The icing should be set and firm, with a slight snap when you bite into it. Arrange them on a platter with some fake spiderwebs and plastic spiders for maximum spooky effect.
Storage: Store the cookies in an airtight container at room temperature for up to 5 days. Layer them between sheets of parchment paper to prevent the icing from sticking. Do not refrigerate—the moisture will make the icing sticky and dull.
Freezing: You can freeze the un-iced cookies for up to 3 months. Wrap them tightly in plastic wrap and then foil. When you’re ready to decorate, thaw them at room temperature, then ice and create the webs. The icing is best applied fresh.
Reheating: These don’t need reheating, but if you want a warm cookie experience, pop one in the microwave for 5 seconds. The icing will soften slightly but won’t melt off.
The flavors actually deepen after a day. The vanilla in the cookie melds with the icing, and the cocoa in the web becomes more pronounced. If you can resist eating them all on day one, day two is even better.
Nutritional Information & Benefits
Let’s be honest—these are a treat, not a health food. But here’s what you’re working with per cookie (based on 24 cookies):
| Nutrient | Amount Per Cookie |
|---|---|
| Calories | 145 |
| Total Fat | 7g |
| Saturated Fat | 4g |
| Carbohydrates | 20g |
| Sugar | 12g |
| Protein | 2g |
The butter provides a small amount of vitamin A, and the cocoa powder in the icing contains antioxidants. If you use dark cocoa, you get a bit more of those beneficial flavonoids. The egg adds a touch of protein and healthy fats. Is it a superfood? No. But it’s a Halloween tradition that brings joy, and that counts for something.
For dietary considerations: these contain gluten, dairy, and eggs. For a gluten-free or vegan option, see the variations section above. The sugar content is moderate for a decorated cookie, but if you’re watching your intake, you can reduce the sugar in the dough by 1/4 cup without affecting the texture too much.
Conclusion
These Spooky Spiderweb Sugar Cookies are the kind of recipe that becomes a tradition. They’re simple enough to make with kids on a weekday evening, but impressive enough to bring to the fanciest Halloween party. The web design never fails to get a gasp of delight, and the cookies themselves are tender, buttery, and perfectly sweet.
I love that this recipe doesn’t require any special skills. You don’t need to be a baker. You don’t need to be an artist. You just need a toothpick and a little patience. And honestly? The imperfections make them better. A slightly wobbly web, a circle that’s not quite round—that’s what makes them look handmade and magical.
So grab your butter, preheat that oven, and make some spooky magic. I’d love to see how yours turn out—drop a comment below with your photos, your variations, or your own Halloween cookie stories. Share this recipe with a friend who needs a little spooky joy in their life. Happy Halloween, and happy baking!
Frequently Asked Questions
Can I use store-bought sugar cookies for this recipe?
Absolutely. If you’re short on time, use plain, un-iced sugar cookies from the bakery section. Just make sure they’re completely cool before you add the spiderweb icing. The homemade version is better, but store-bought works in a pinch.
Why did my spiderweb pattern disappear?
This usually happens when the white icing is too wet when you drag the toothpick. Let the white icing set for 5-10 minutes until it’s tacky but not wet. Also, make sure your dark icing is thick enough—if it’s too runny, it will bleed into the white.
Can I make the dough ahead of time?
Yes! You can make the dough up to 3 days in advance. Wrap it tightly in plastic wrap and keep it in the fridge. Let it sit at room temperature for 10 minutes before rolling. You can also freeze the dough for up to 3 months.
How do I get perfectly round cookies?
Use a sharp round cookie cutter and press straight down without twisting. Twisting seals the edges and prevents the cookies from rising evenly. If you don’t have a cutter, a clean, empty tin can works beautifully.
Can I use food coloring instead of cocoa for the dark icing?
Yes, but the flavor will be different. Black gel food coloring works well, but it can have a slightly bitter aftertaste. Start with a tiny drop and mix thoroughly. Cocoa powder gives a richer flavor and a more natural “spiderweb” look.
Pin This Recipe!

Spooky Spiderweb Sugar Cookies: Easy Halloween Treat
These Spooky Spiderweb Sugar Cookies are soft, buttery, and decorated with a simple two-tone glaze that creates a stunning spiderweb design. They look like you spent hours but come together in under 45 minutes, making them the perfect last-minute Halloween treat.
- Prep Time: 15 minutes
- Cook Time: 10 minutes
- Total Time: 45 minutes
- Yield: 24 servings 1x
- Category: Dessert
- Cuisine: American
Ingredients
- 1 cup (226g) unsalted butter, softened
- 1 cup (200g) granulated sugar
- 1 large egg, room temperature
- 1 teaspoon vanilla extract
- 2 cups (250g) all-purpose flour
- 1/2 teaspoon baking powder
- 1/4 teaspoon salt
- 2 cups (240g) powdered sugar, sifted if lumpy
- 3–4 tablespoons milk, whole milk preferred
- 1/2 teaspoon vanilla extract
- 2 tablespoons unsweetened cocoa powder
- 1–2 teaspoons water
Instructions
- Preheat your oven to 350°F (175°C). Line two baking sheets with parchment paper.
- In a medium bowl, beat the softened butter and granulated sugar together until light and fluffy, about 2-3 minutes. Scrape down the sides once.
- Beat in the egg and vanilla extract until fully combined.
- In a separate small bowl, whisk together the flour, baking powder, and salt.
- Gradually add the flour mixture to the butter mixture, mixing on low speed until just combined. Stop as soon as no white streaks remain.
- Wrap the dough in plastic wrap and refrigerate for 15 minutes (optional but recommended).
- On a lightly floured surface, roll the dough to about 1/4-inch (6 mm) thickness. Use a 2.5-inch (6 cm) round cookie cutter to cut out circles. Re-roll scraps once.
- Place the cookies about 2 inches apart on the prepared baking sheets. Bake for 8-10 minutes, until the edges are just barely golden. Let cool on the baking sheet for 5 minutes, then transfer to a cooling rack.
- Make the white icing: In a small bowl, whisk together the powdered sugar, 3 tablespoons of milk, and vanilla extract. It should be thick but pourable. Add the extra tablespoon of milk if needed.
- Make the dark icing: In another small bowl, whisk together 1/4 cup of the white icing with the cocoa powder. Add water, one teaspoon at a time, until it reaches the same consistency as the white icing.
- Once the cookies are completely cool, spread a thin, even layer of the white icing over each one. Let it set for 5 minutes until tacky but not wet.
- Fill a squeeze bottle or piping bag with the dark icing. Pipe a small dot in the center of each cookie, then pipe 3-4 concentric circles around the dot, spacing them about 1/4 inch apart. Working quickly, drag a toothpick from the center dot outward through all the circles. Repeat 4-5 times around the cookie, spacing the drags evenly.
- Allow the cookies to sit at room temperature for 20-30 minutes until the icing is firm to the touch. Then serve or store.
Notes
For best results, do not overbake the cookies; pull them out at 8 minutes when edges are just set. If the dark icing thickens while working, add a drop of water. Practice piping on parchment paper first. Store in an airtight container at room temperature for up to 5 days; do not refrigerate.
Nutrition
- Serving Size: 1 cookie
- Calories: 145
- Sugar: 12
- Sodium: 50
- Fat: 7
- Saturated Fat: 4
- Carbohydrates: 20
- Protein: 2
Keywords: Halloween cookies, spiderweb cookies, sugar cookies, easy Halloween treat, decorated cookies, spooky cookies



